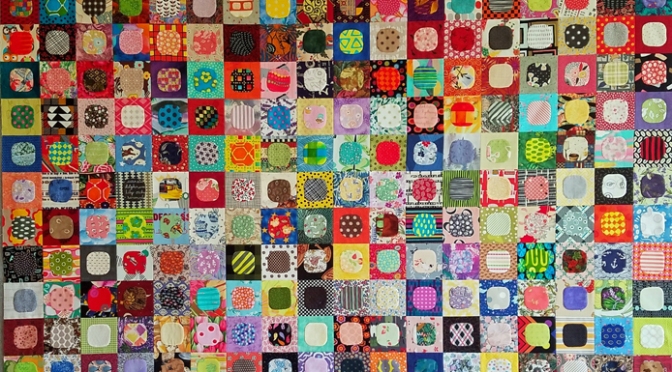
In 2017, I decided to try another daily project. (I once tried the 100 day project, but only made it to Day 10…!) Inspired by some wonderful circle quilts by Sophie @lunalovequilts, I thought I could commit to creating one squircle a day for 365 days. I’d always wanted to try needleturn applique, so this seemed like a simple shape to practice that skill.
It was through Sophie that I also found the #quilty365 page on Instagram, and a little more research lead me to this post by Audrey of Quilty Folk.
I decided to make it scrappy, and since I have over 25 years of scraps, I tried not to duplicate any fabrics. It was very entertaining to pair up interesting and unlikely fabric combinations for each block. (The background squares were cut at 4 inches, and the squircles were made from a 2.5 inch square.)
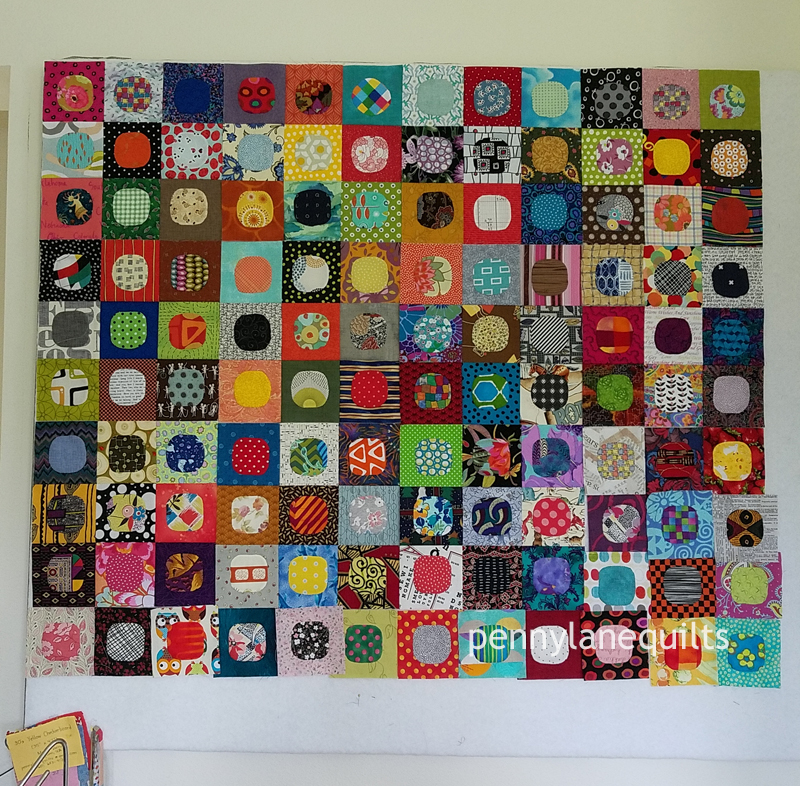
squircle blocks filling my small design wall
Each month I sewed the blocks into nine patch blocks. I didn’t want to have all of them to assemble at the end of the year! When the small design wall was full, we made a larger design wall. Now I was able to lay out the blocks the full width of the quilt and I began to assemble the nine patches into rows. (Even though I wasn’t doing much manipulating of the blocks for design purposes, I needed to have the blocks up so I could see which fabrics had been used.)
For the most part, I completed a squircle a day. There were a couple of times that I got behind, like when I left my hand sewing kit in a hotel in Nebraska on our road trip to Paducah! But whenever I got off track, I tried to catch up as soon as possible.
My goal was to have the top assembled by midnight on New Year’s Eve and I am proud of myself for finishing with a few hours to spare! To make my layout (18 blocks x 21 blocks) work, I needed to make 13 extra squircles. That makes a total of 378 squircles x 2 background fabrics = 756 different scraps used. (Ooops, subtract 2 because a couple of duplicates sneaked in when I wasn’t looking!)
2018 brings an opportunity to do something new with squircles, so stay tuned to see version 2.0, using solids and pieced background blocks. So far, so good at completing a squircle a day in this new year.
Writing this post feels a bit like a plunge into icy water, but I’m going to break the ice and get back to blogging.
Laughably, my word of the year was “focus”, but my focus only lasted until February! So here goes with a review of my goals for 2017 and a plan for new beginnings in 2018.
Review of my 2017 goals
Learning:
develop free motion quilting skills
learn to use the HQ Sweet Sixteen midarm
practice photography skills
attend lectures at QuiltCon East
It was a terrific year for learning.
January: A friend and I went to Road to California to take a couple of classes on free motion quilting from David Taylor. I practiced every day for almost two months. It was just beginning to be fun when I fell out of the habit. This will be a priority in 2018.
February: The lectures at Quiltcon East in Savannah were informative and I appreciate all those who share their experience and inspiration.
March: A trip to LaConner, Washington to view Gwen Marston’s wonderful exhibition was definitely inspirational!
April: I loved taking Katie Pedersen’s (sewkatiedid) Psychedelic Baby block class in her wonderful home studio along with Daniela (blockmquilts) from Germany. I treasure the time we spent together and that quilt is currently being hand quilted.
July: Maria Shell (talesofastitcher) has a wonderful blog that I have followed for years. When I discovered that she would be teaching at Quilter’s Affair in Sisters, Oregon, I jumped at the chance to take some workshops. Her improv work is so unique and she is a gifted instructor. I finished a small piece that began in her workshop and I am contemplating how to use the new techniques in my own work.
September: At the AQS Fall Paducah show in Kentucky, I was privileged to attend a lecture by Maria Shell and learned more about her journey as an artist.
These were all wonderful experiences, but they may have contributed to my difficulty focusing. The creative part of my brain has been just dancing with possibilities!
Exhibiting:
exhibit at QuiltCon East
enter new venues
participate in SDA events
Two quilts exhibited at QuiltCon East in Savannah, “Trestle Nestle” and “jubilant”. It is an honor to have quilts selected and humbling to see them with all the creative work on display.
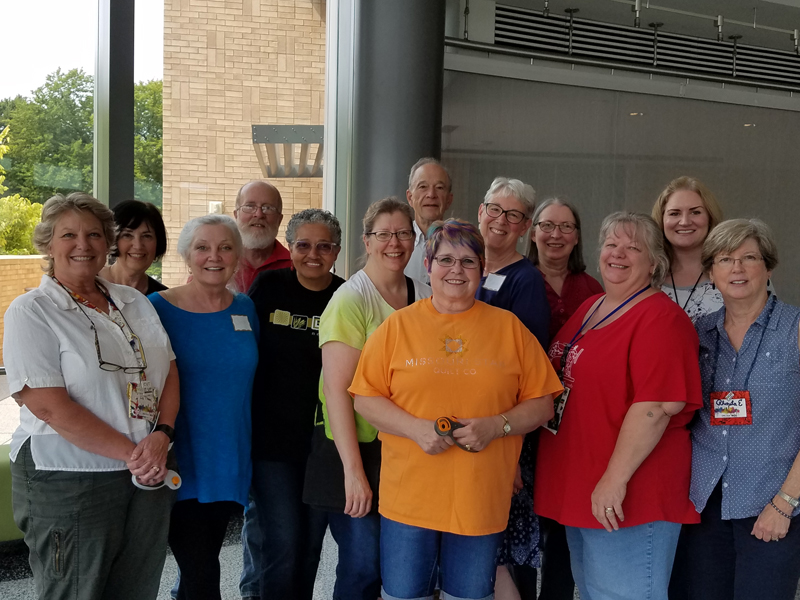
My quilt, “Hourglass Bedazzled” was a semi-finalist in the first Fall Paduchah show. We had always wanted to visit Kentucky, so my husband and I decided to take a long road trip. Our combined love of horses and quilts led us to so many interesting sights along the way. A highlight for me was visiting the International Quilt Study Center and Museum in Lincoln, Nebraska. There I had the privilege of attending a “Behind the Scenes” tour, and met the members of the Lincoln MQG and the regional SAQA group.
Lincoln MQG sew day at IQSCM
The Bainbridge MQG had a “Red, White and Blue” challenge to coincide with Bainbridge Island Fourth of July festivities.
Our local Surface Design Association group had two main exhibitions this year. These innovative artists are such an inspiration and they use fiber in so many unique ways.
Byways, no.1, 24.5″ x 23″
The Port Gamble Fiber Festival and the North Olympic Fiber Arts Festival gave me an opportunity to exhibit and to sell my work. Each year I am inspired by the variety of textiles on display and by the innovative work of our local fiber artists.
Selling:
limit vending to 2-3 major events per year
explore selling online
This year I was a vendor at two major events, but also at three smaller venues. I did not explore online sales, but I did begin selling at the Lamb Farm Kitchen Shoppe in Sequim.
Creating:
dye new fabric
improvise a major piece
hand quilt a major piece
limit items to sell, providing time for personal art
keep a better record of finished projects
participate in my first mini swap, the 2016 MQG Modern Mini swap at QuiltCon East
Okay, here’s where all those classes, traveling and vending took their toll. I did not dye any fabric, or finish a major quilt. But by midnight tonight I will hopefully have finished the top for my “squircle a day, 365” project, which has really been fun. (I’ll share more about that in my next post.) I participated in the mini swap at QuiltCon, where I received a wonderful mini from Sandra Kaye @sandieloves2quilt.
Sharing:
post to Instagram and Facebook at least 2x per week
post to blog at least 2x per month
create some tutorials to share
I averaged posting to IG just over two times a week, but realized that posting to Facebook that often didn’t feel comfortable. This is only my fifth blog post. Yikes! And tutorials never materialized…
Donating:
continue to create giving quilts
In February, I donated a couple of blocks to Quilts for Quebec, and I have two quilts finished and ready to donate in the new year.
Finding Balance:
schedule time to develop healthy habits
balance business and personal creating time
As discussed above…the struggle is real!
So here’s to the New Year and my goals for 2018. Many are the same, but I have cut back expectations in some areas to facilitate more production in the creating department!
Goals for 2018
Learning:
Free motion quilting – Focus on regular practice
Exhibiting:
exhibit at QuiltCon Pasadena
enter new venues
participate in SDA events
Selling:
limit vending to 1-2 major events per year
continue retail at Lamb Farm Kitchen Shoppe
Creating:
start a new “squircle a day, 365” project, using solids and improv piecing this time around
improvise a major piece
hand quilt a major piece
limit items to sell, providing time for personal art
keep a record of finished projects
participate in my second mini swap, at QuiltCon West, Pasadena
submit mini challenges to Curated Quilts
Sharing:
post to Instagram at least 2x per week
post to Facebook at least 2x per month
post to blog at least once a month
Finding Balance:
schedule time to develop healthy habits
balance business and personal creating time
use my Quilter’s Planner more effectively this year to help organize and track my habits
You know how it is when you neglect something for so long that it is embarrassing to get started again? Since my last post featured snow, this one will be a quick recap on some spring activities and hopefully get me motivated to continue blogging on a more regular schedule!
The end of February brought a trip to Savannah and a wonderful time connecting with friends at QuiltCon East.
If you missed out on the fabulous quilts on display, Kristin Shields has provided a series of posts highlighting many of the amazing quilts. Check out her excellent recaps by category and enjoy her beautiful quilts, as well.
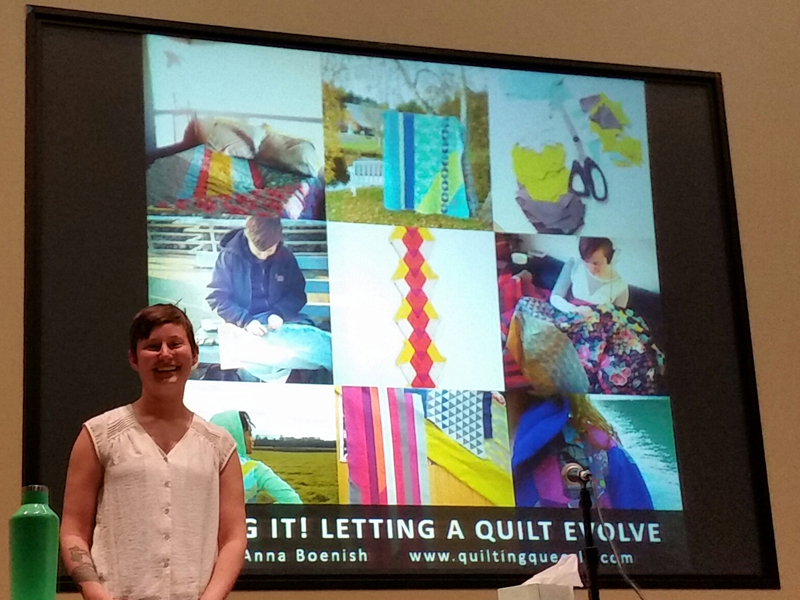
Besides viewing quilts, I was inspired by the many lectures I attended. It was a privilege to hear long time friend, Anna Boenish @quiltingqueerly share her creative journey and personal insights into leading an intentional life.
It was my first trip to Savannah and I enjoyed the architecture and riverside attractions in this historic city.
March brought a visit to the Pacific Northwest Quilt & Fiber Arts Museum in LaConner, WA to view a collection of quilts by Gwen Marston. I really enjoyed spending the day with friends and the opportunity to view Gwen’s quilts in an intimate setting.
High Desert III, 2008, Gwen Marston
In April, quilting friend, Stan Green, had a solo exhibit at the Sequim Museum and Arts Center. It was a wonderful opportunity to see a retrospective of his beautiful work.
Stan Green with “Taboo”
Spring colors get my creativity flowing and I enjoy watching the plants awake from winter.
If you follow @pennylanequilts over on Instagram, you can find photos of my quilting projects during the spring. Now that I have “broken the ice”over here in blog land, I’ll share details on some of those projects soon. Thanks for being patient with me. It is so hard to sit down at the computer when there are stitches to be sewn!
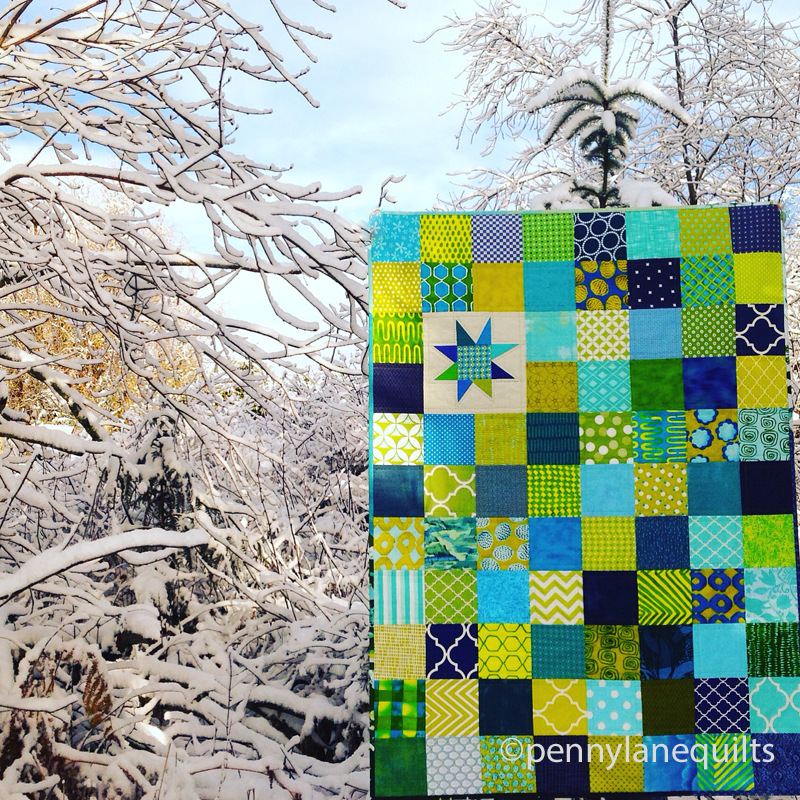
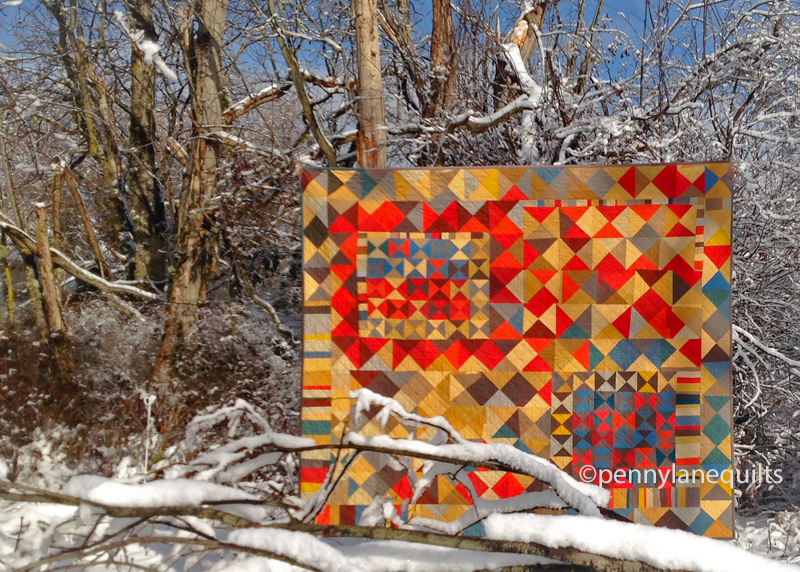
Our winters are mild, so snow days are a novelty. This week I took advantage of a sunny morning and a lovely, snowy backdrop to take a few quilt photos.
Zig Zag Chevron (HSTs from charm squares, hand quilted)
One of my goals for 2017 is to improve my photography skills. Of course, this means learning how to use editing software. I’m trying to check out some of those helpful tutorials in the process.
My first finish of 2017: baby quilt made from charm squares + a wonky star
The photo pictured above was edited for Instagram using a mobile app.
Hourglass Bedazzled, improv piecing, hand dyed fabrics, machine quilted
This quilt was the last one I completed in 2016. It is my most complex quilt to date that uses improvisational piecing, and I hand dyed all of the fabrics. I don’t think I ever properly documented it, but a few photos appeared on Instagram during the months that it was in process.
On another note, QuiltCon is right around the corner! Our newspaper, the Sequim Gazette, was kind enough to write an article about the local quilters who will have quilts in Savannah. They even sent a photographer out to capture me in my own environment. Those of you who are curious and have bugged encouraged me to include photos of myself on this site, can check it out.
It is snowing again today, so I’m off to curl up with a cup of tea and some hand quilting. I’m on the home stretch quilting the mini for my partner in the MQG swap.
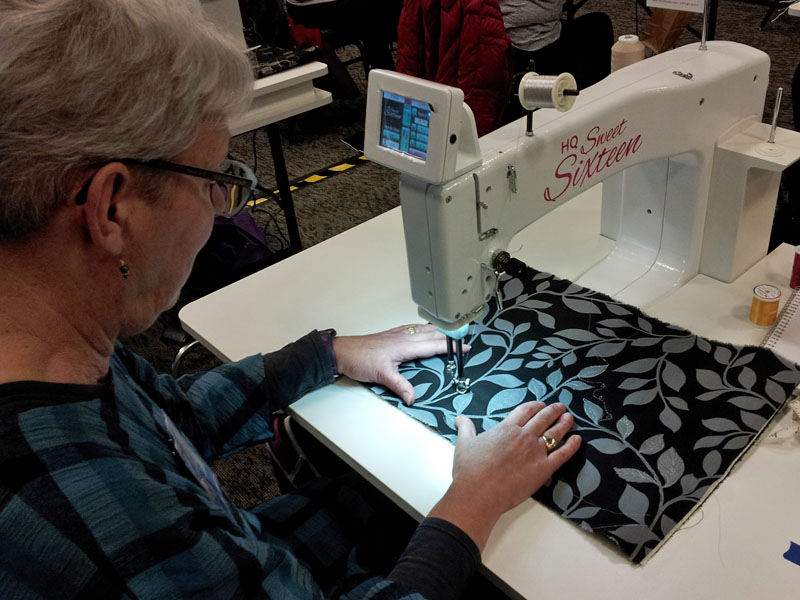
My goals for 2017 include learning how to free motion quilt, specifically on our Handi Quilter Sweet Sixteen machine.
A few years ago, a friend and I decided to purchase a used sit down midarm. Neither of us had much experience with free motion quilting, but we figured we would just jump in and learn on the new machine. For a few months we practiced, watched videos and quilted a few projects and quilts.
However, life “happened”, and our priorities shifted. My friend moved away for a year and I focused my energies on my walking foot, straight line quilting. The poor machine sat neglected and unused for about a year and a half. After awhile, I felt a bit intimidated about getting started again. Would I remember how to use the machine? Could I effectively adjust the tension? Was I willing and interested enough to begin practicing again?
Then we came across a notice from Road to California announcing that David Taylor would be teaching a couple of classes using HQ Sweet Sixteens. One class focused on finding your own tempo and rhythm for free motion quilting, and the other emphasized using a variety of threads , adjusting tension and choosing needle sizes. Just what we were looking for to ease us back into the process.
waiting for class to begin in a classroom full of HQ Sweet Sixteens
David’s classes were entertaining and informative. A series of exercises helped us practice techniques, and the Handi Quilter reps were there to assist with the machines. That quick trip to Ontario gave us helpful hints, experience and confidence to come home and get started again.
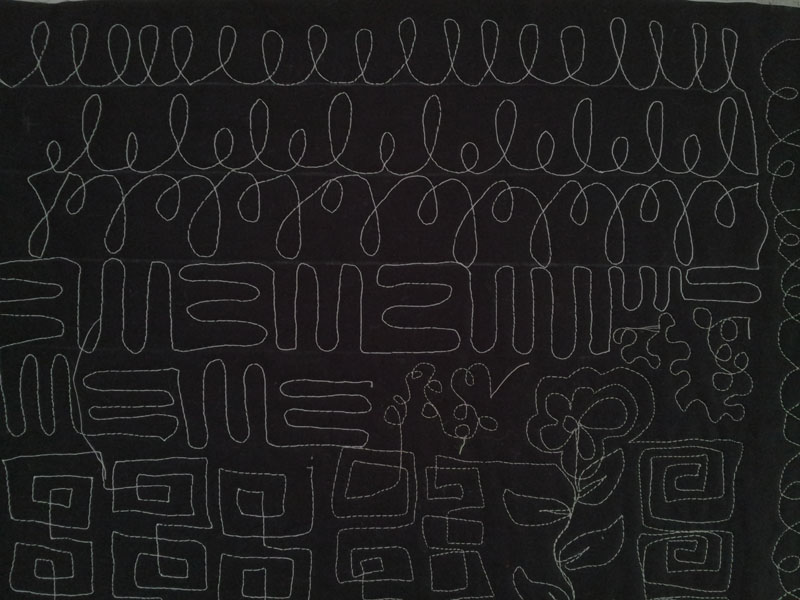
Practice exercise using glitter thread
My goal is to spend at least a few minutes each day practicing and to start building muscle memory. It is one of the daily quilting tasks that I keep track of in The 2017 Quilter’s Planner to hold myself accountable. As an added bonus, each week the planner features a fmq motif to practice and Stephanie Palmer @latenightquilter is creating short videos to introduce the designs. I was super excited to see that she demonstrates using a HQ Sweet Sixteen!
Each day brings a new opportunity for practice, my confidence is growing and I am actually starting to have some fun in the process!
Stay tuned for progress reports. Now it’s time to go practice!
The first week of the new year began with getting a couple of quilts prepared for QuiltCon East in Savannah and getting them shipped. I am very excited to have two quilts juried into the show this year.
The first one is titled “jubilant” and it is entered in the Small category.
“jubilant” (28″ x 30″) hand dyed cottons, Essex yarn dyed linen, matchstick quilting
The second quilt is called “Trestle Nestle” and it is entered in the Handwork category.
Trestle Nestle (56″ x 51″) hand quilted, white linen and Kona solids
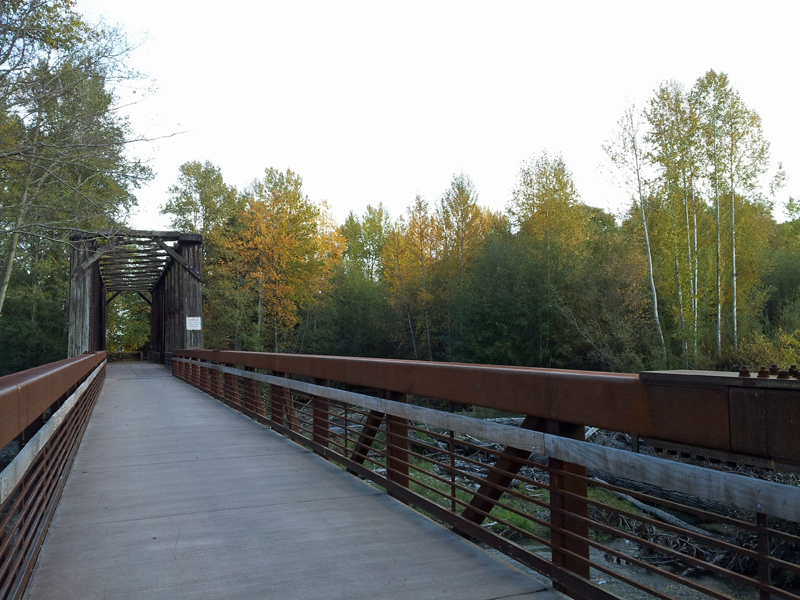
The shapes for this quilt were inspired by a local trestle on a trail where I enjoy walking and cycling.
Railroad Bridge trestle on the Olympic Discovery Trail, Sequim, Washington
Sleeves and labels were attached, and instructions printed.
It always seems to take me longer than I expect to prepare for shipping! The first hurdle is finding a box the correct size. In the past, I have been happy with a box that I was able to purchase at the UPS store, but they didn’t have any in stock this time around. (The recommendation by shows is that you put the quilts in a new box because boxes can become weakened when used.) Since I wasn’t able to locate a new box, I ended up reusing a box, but I reinforced it with a LOT of packing tape.
Then there is the plastic bag to keep your quilt safe from the elements. Recently, I have been using XLarge Ziploc® bags. They are sturdy, reusable and measure 2 ft x 1.7 ft.
It always makes me a little nervous when I drop that package off at the post office. I sent it with a signature required, so I will be tracking it today and making sure it arrived safely!
It won’t be long before I will need to get myself ready to travel to Savannah.
I wish I didn’t have to begin another post with, “it’s been awhile…”, but it surely has been a long dry spell without a post! I managed to have more commitments than time this fall. The outcome was that I accomplished a lot, but some of those deadlines were a bit stressful. So, I have been setting priorities and goals for the coming year in hopes of avoiding that particular pitfall.
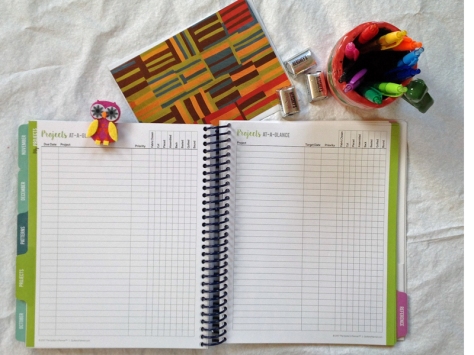
Thanks to Jennifer Strauser @DizzyQuilter for The Quilter’s Planner and extra goodies!
In reflecting on my work and personal habits, I see that deadlines help me create a sense of urgency and actually get things finished, but I need to allow enough time and flexibility in my schedule in case life throws me a curve ball. The Quilter’s Planner is the tool I’m using to help me get organized. I’m very excited to have something so beautiful to track my projects, quilt show deadlines, learning opportunities and business events.
It was helpful to look back at this year and to see what was accomplished.
2016 Recap:
Exhibited quilts at:
AQS Quiltweek, Grand Rapids
AQS Quiltweek, Chattanooga
AQS Quiltweek, Des Moines
NOFAF, Sequim
Vendor at:
Irrigation Festival Arts & Crafts Fair
Port Townsend Studio Tour
Bainbridge Island Museum of Art Pop Up Art & Craft Fair
Jamestown Annual Holiday Craft Fair
North Olympic Fiber Arts Market
Opulent Evening
Retail outlet at Molly B’s Salon, Sequim
Blogging:
participated in 2016 New Quilt Bloggers group
took a class on WordPress at the community college
wrote a tutorial for the Cloud9 New Block Blog Hop
Giving quilts:
donated pixelated heart quilt to Quilts for Pulse (Orlando MQG)
donated 2 quilts for Project Linus (Vulture Peak Patchers)
Goals for 2017:
Learning:
develop free motion quilting skills
learn to use the HQ Sweet Sixteen midarm
practice photography skills
attend lectures at QuiltCon East
Exhibiting:
exhibit at QuiltCon East
enter new venues
participate in SDA events
Selling:
limit vending to 2-3 major events per year
explore selling online
Creating:
dye new fabric
improvise a major piece
hand quilt a major piece
limit items to sell, providing time for personal art
keep a better record of finished projects
participate in my first mini swap, the 2016 MQG Modern Mini swap at QuiltCon East
A confession…I love leftovers, both food and fabric! They give me an opportunity to be creative, I feel virtuous for not being wasteful and sometimes they even save me a little time.
Here are a few recent finishes that began as orphan blocks, trimmings or bits and pieces floating around the scrap bin and design wall.
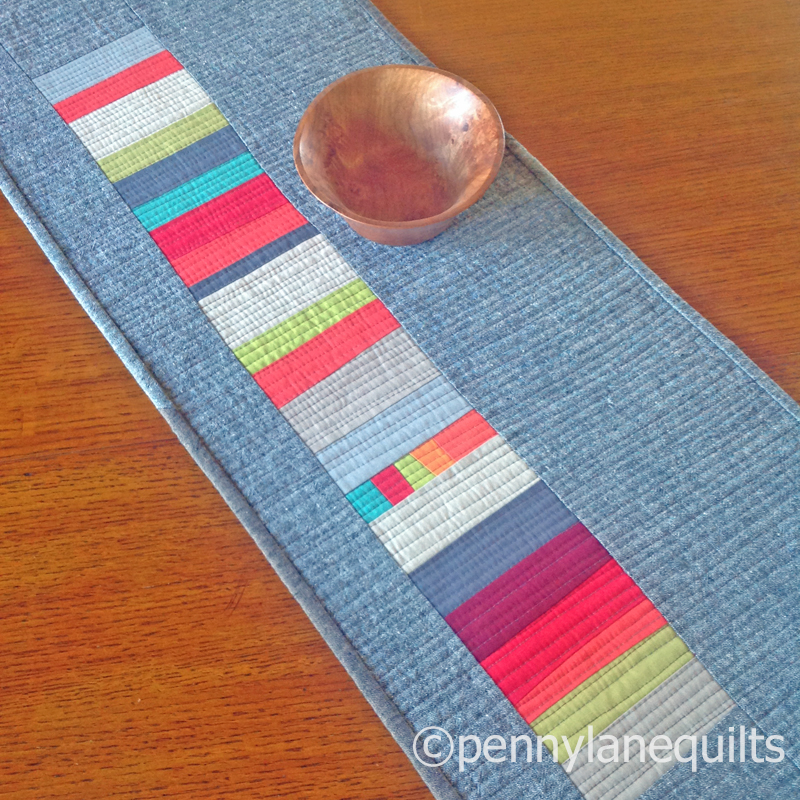
Some leftover strips became a table runner.
Essex yarn dyed linen + commercial solids for the stripes
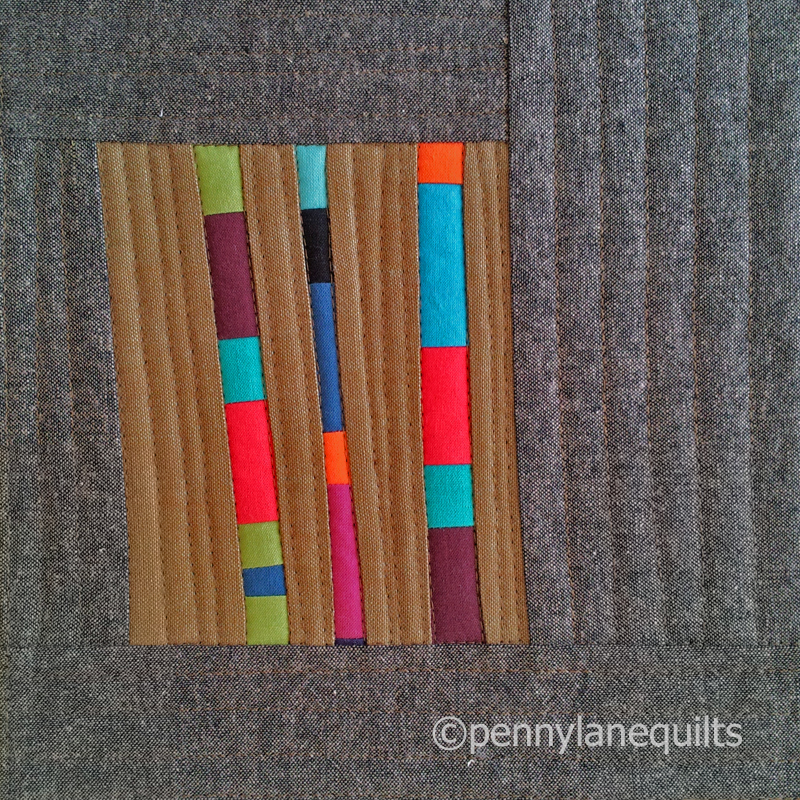
A few orphan blocks became a pillow and a table mat.
And sometimes everything “clicks” and a few units that have been marinating for a long while are the impetus for something that keeps me exploring, and revising, and reworking until it makes me very happy!
“jubilant”, hand dyed cottons, Essex yarn dyed linen, matchstick quilting
So, the moral of the story is… save all those leftover bits because you never know when they will be just what you need to get your next project started!
(The table runner and place mats in the featured image began as some odds and ends from the recent Riley Blake challenge.)
A friend encouraged me to participate in the Blogger’s Quilt Festival, hosted by Amy of Amy’s Creative Side. I’ve decided to enter one of my favorite quilts, Coral Reef, in the Hand Quilted category. This quilt was completed a couple of years ago, but it will always be a special finish for me. It was made before my blogging days, so this post is an opportunity to share its story.
It began as a pile of half square triangle units created while at a retreat with some local quilty friends. (The nearby Seattle MQG members had recently hosted a bicolor challenge which is what got me thinking about trying a two color quilt.) After much arranging and rearranging on my design floor, I decided on the final layout.
When it was basted, I started machine quilting it, but after a few lines of quilting, I changed my mind and decided it would be more fun to hand quilt. So I dug out all my aqua and orange threads, put it in my hoop and started stitching. It was the perfect canvas for dense hand quilting with a variety of thread types and weights. (It was also a great excuse to buy some new threads!) I took an improvisational approach and made up the designs as I went without marking. It was so.much.fun!
The texture created by the quilting is my favorite feature of the quilt.
Planning to attend QuiltCon for the first time in 2015, I decided to enter the show, so I worked feverishly to finish it up before the deadline.
It was accepted and I was very excited to have it in the exhibition! What a thrill it was to learn that it had been chosen to receive the Coat’s Award of Quilting Excellence and to see it hanging there at the show. (My husband was even impressed to learn that it was possible to make money with a quilt.)
That prize money was used to start a small home business, penny lane quilts. To see my current projects and upcoming events, you can also find me hanging out on IG at pennylanequilts and on Facebook at penny lane quilts.
Coral Reef was exhibited in our local North Olympic Fiber Arts Festival last fall, and is currently traveling to some AQS Quiltweek shows in Grand Rapids, Chattanooga and in the upcoming Des Moines, Iowa event. I’m looking forward to having it back home soon!
The backing fabric is a beautiful floral from Amy Butler’s Lark collection.
This quilt remains one of my favorites, not because it won a ribbon, but because of all the hours that I spent lovingly stitching its layers together. I know many of you have seen this quilt before, but I hope you enjoyed learning a bit more about it. I currently am hand quilting away on another quilt, but Coral Reef taught me that I need to pace myself with hand work. Hopefully I will have the new one finished well before any deadlines…we’ll see!
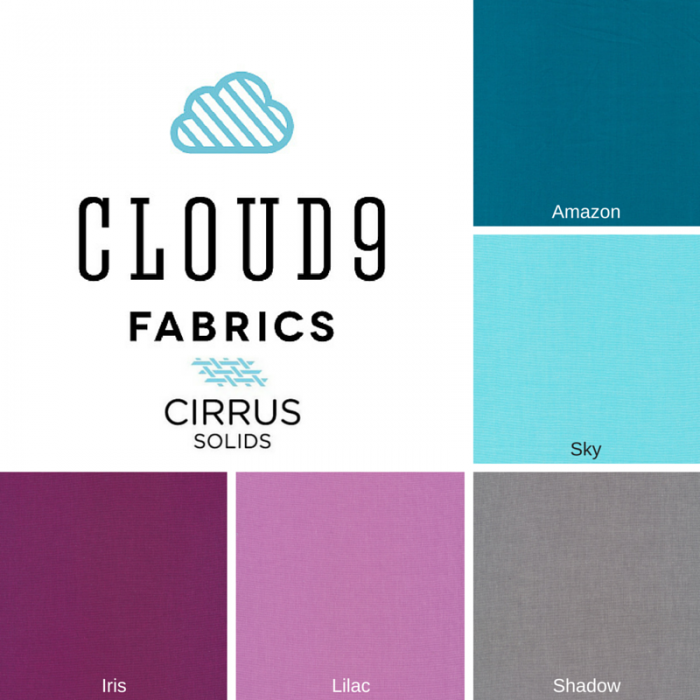
Welcome to the second day of the 2016 Cloud9 New Block Blog Hop!
It is so exciting to be part of the block hop, sponsored by Cloud9, and hosted by Yvonne of Quilting Jetgirl, Cheryl of Meadow Mist Designs and Stephanie of Late Night Quilter! There are almost 70 bloggers designing blocks using the fat quarter bundle of lovely organic Cirrus Solids generously provided by Cloud9 fabrics. The hosts chose this palette for the hop, called “Berry Harvest”. I decided to use four of the colors, leaving “Lilac” out this time around.
My block, Woven Berry Basket, is an improvisational block based on the traditional basket weave design. It uses a free form cutting technique (a.k.a cutting without a ruler).
The goal of this tutorial is to introduce you to this technique. There are two main principles that I use in improv piecing:
if it is too short, add on
if it is too long, cut it off
Your block will not be exactly like mine, but I will describe a process that you can use to make one that is similar in design.
Tips for improv piecing:
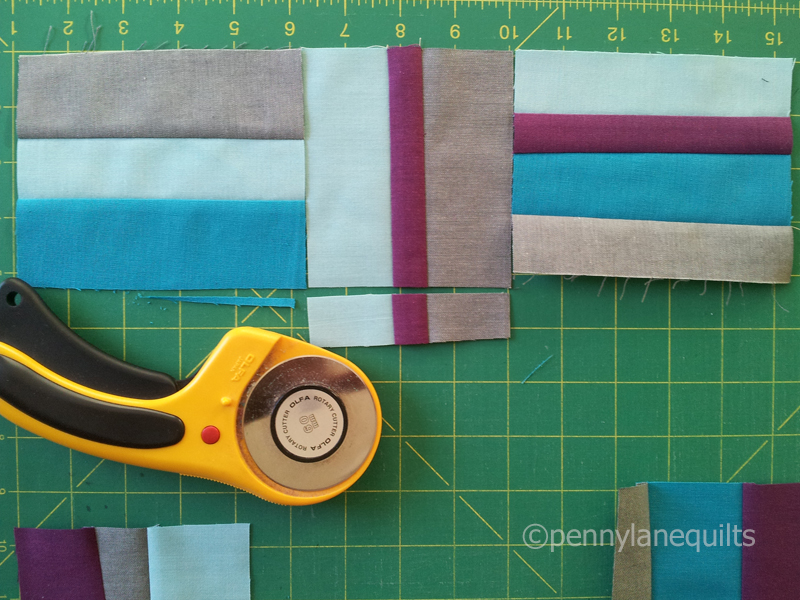
A rotary cutter with a 60mm blade is my preference for free form cutting
Set the stitch length on your machine a little shorter than usual
Cut 4 strips 5 in x 18 in (approx) Here’s your first chance to cut without the ruler!
free hand cut the equivalent of 4 strips approx 5 x 18 (notice the cut is straight-ish)
2. Free hand cross cut strips that vary from about 1 in – 2 .25 in width from each strip
I like to cut each strip individually, some are slightly angled, but most are straightish
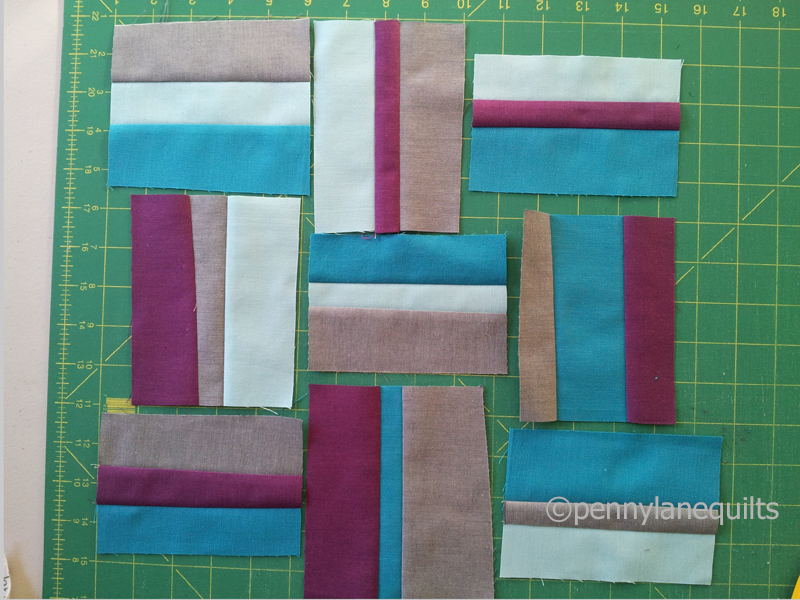
3. Stitch 9 pairs of strips together, varying the colors and widths.
chain piece 9 sets of strips, no need for pins, just go slowly and align the edges as you go
4. Press seams to the darker fabric
variety of widths and color combinations
5. Add a third strip to each set, again varying the color placement and width of strips.
6. Lay out the 9 units in an alternating vertical, horizontal pattern.
To end up with a 12.5 unfinished block, we will aim to have each unit be at least 4.5 in on each side before assembling. (I trimmed the ends to even up the units.)
*At this point, you will need to start making decisions based on how your units are sized. I will attempt to describe how I solved the puzzle.
For the first row, I decided to cut the bottom off the middle unit, and add a strip to the third unit.
If it’s too long, cut it off and if it’s too short, add on!
I followed the same procedure for the second row:
a strip added to the middle unit
But when the units were assembled, the second row was shorter than the first, and I was aiming to have each row approx 13 in wide so that I would be able to trim it down to 12.5 in. What to do? Add on!
I used the cutting mat measurements to see if the overall width was about 13 inches
To assemble the rows, I trimmed the top edge of the second row, then overlapped it onto the bottom of the first row (right sides facing up). Using that cut edge as my guide, I trimmed the bottom of the top row to match.
*use the ruler to stabilize the edge, but do not use it as a cutting edge
Follow the above procedures to assemble the third row and attach.
Can you see how I am cutting along the edge of the row, not along the ruler edge?
If your block is big enough, just trim to 12.5 in square and your block is complete. If it is too small, improvise! You might add some strips to form a frame, and then trim.
Success! Trim to 12.5 inches and you’re finished.
Here is my finished block:The thing I like best about improvisational work is that you are engaged making design decisions throughout the process. *Warning: this may be addictive! As I work, I find myself asking lots of “What if?” questions:
What if I cut the strips wider (or thinner)?
What if I used 5 colors?
What if I only used 2 colors?
What if it was scrappy?
What if the units were smaller and I made a 4 x 4 grid?
I hope you will give this a try, and that you will enjoy the process as much as I do. If you make a block, I’d love to see it! For those on Instagram, tag your photo @pennylanequilts and use the hashtag #wovenberrybasket.
Thanks for stopping by! I’d love to hear your thoughts and answer any questions you may have.
And don’t forget to enter the Giveaways! Visit each of our wonderful hosts for the chance to win 3 separate fat quarter bundles of beautiful Cloud9 Cirrus Solids.
Be sure to check out the rest of the stops on the hop. You’ll be glad you did!