Last winter, I worked on several quilts for the family of my friend, Pat, who we lost in January. You can learn more about her artwork and the impact she had on my own work in this post.
Pat’s family collected some of her signature striped and checked shirts as well as other garments for me to use.
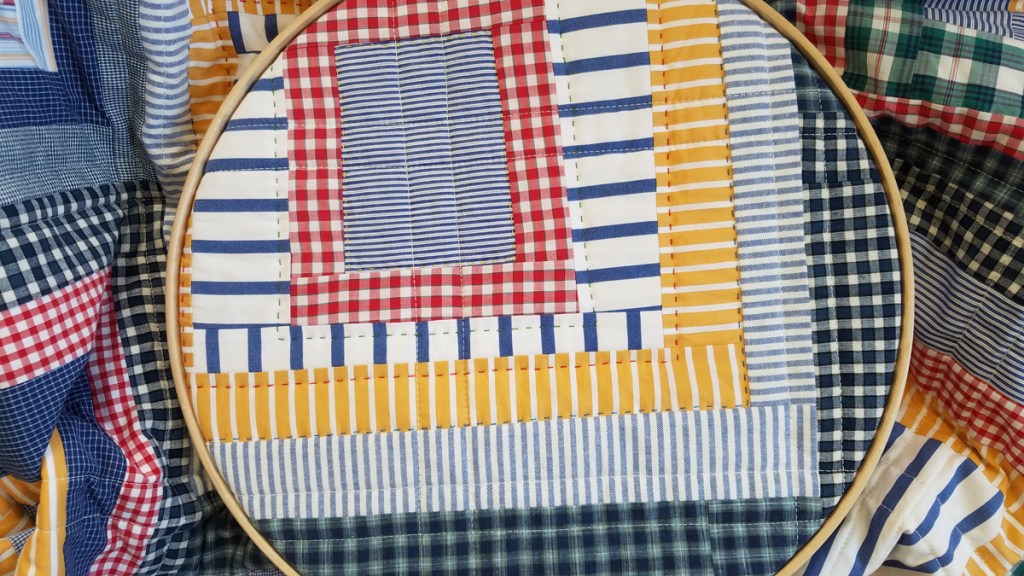
The first one I pieced was a twin sized quilt for her husband. I began by using flannel pajamas for the backing with woven strips from shirts and blouses for fillers. The top was made up of large log cabin blocks pieced from shirts and framed with homespun woven fabrics I found in her stash. This gave a little continuity to the design and helped bring the blocks up to size.
This is the largest quilt I’ve quilted by machine and I began with a grid following the seam lines. The rest of the quilting was completed by hand, quilting around the squares with perle cotton threads.
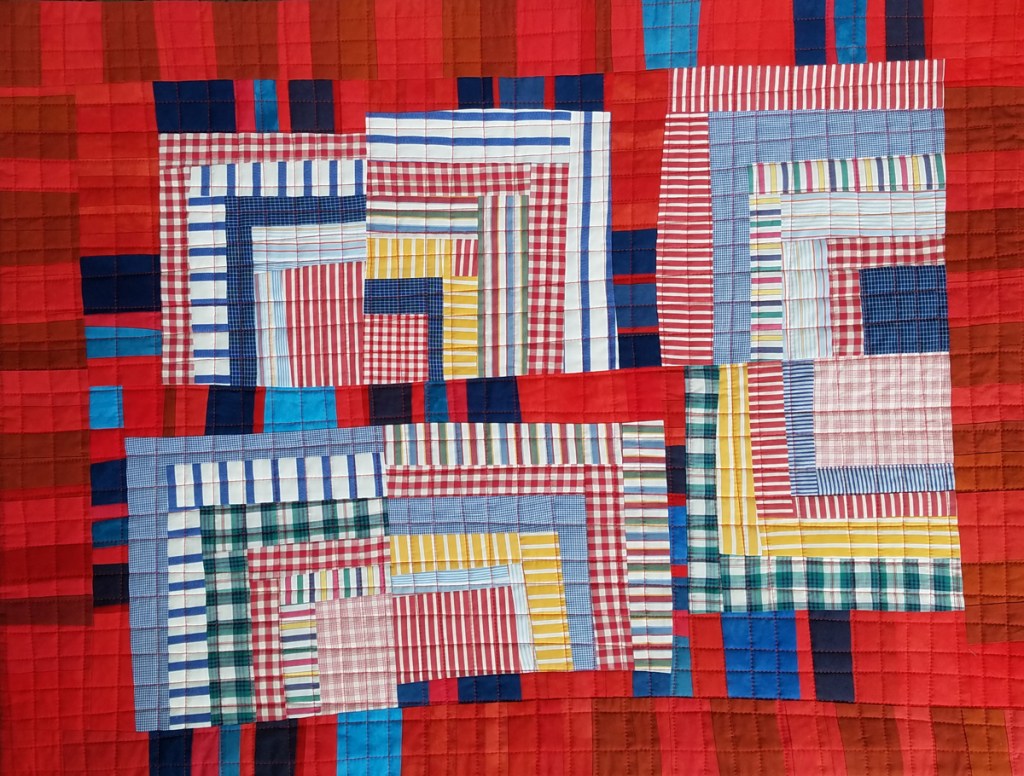
The next quilt was a wall hanging for one of her daughters. Her request was to combine clothing with her mother’s hand dyed fabrics. Pat’s favorite color was red, so I started with some of her scraps including a few units that she had pieced. This one has a backing made up of pajama fabrics and is machine quilted with an organic grid.
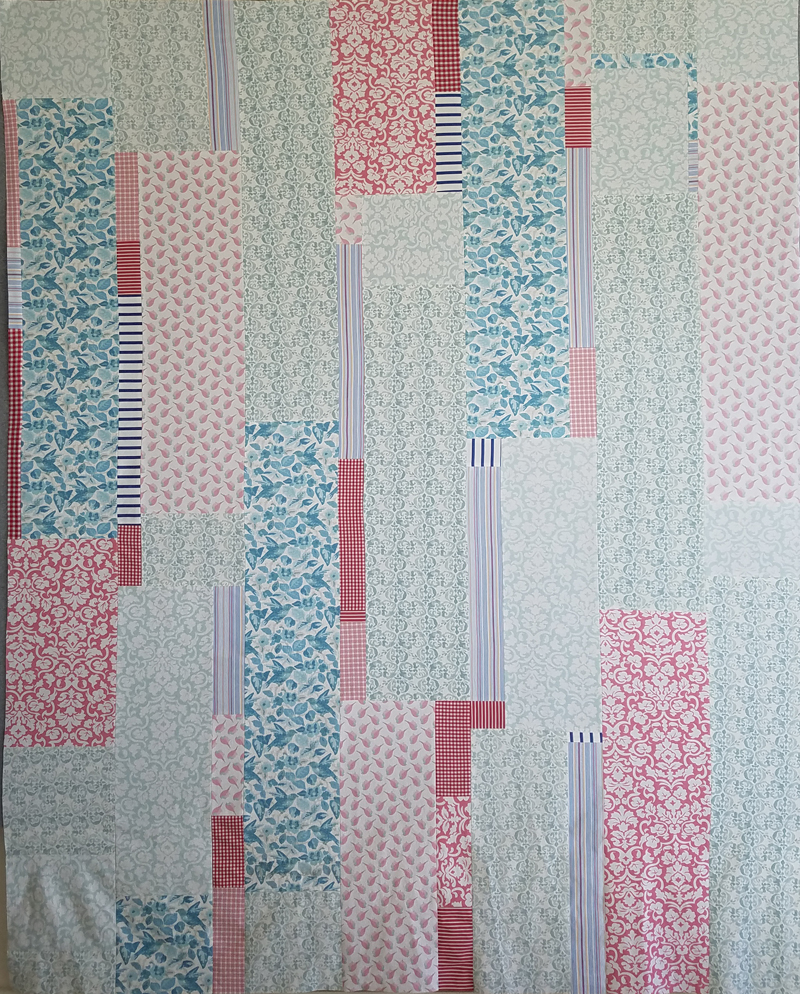
A wall hanging for another daughter also featured Pat’s hand dyed fabrics. The light blue background fabric came from a beautiful linen blouse and pajamas were again used for the backing. It is machine pieced with organic straight lines.
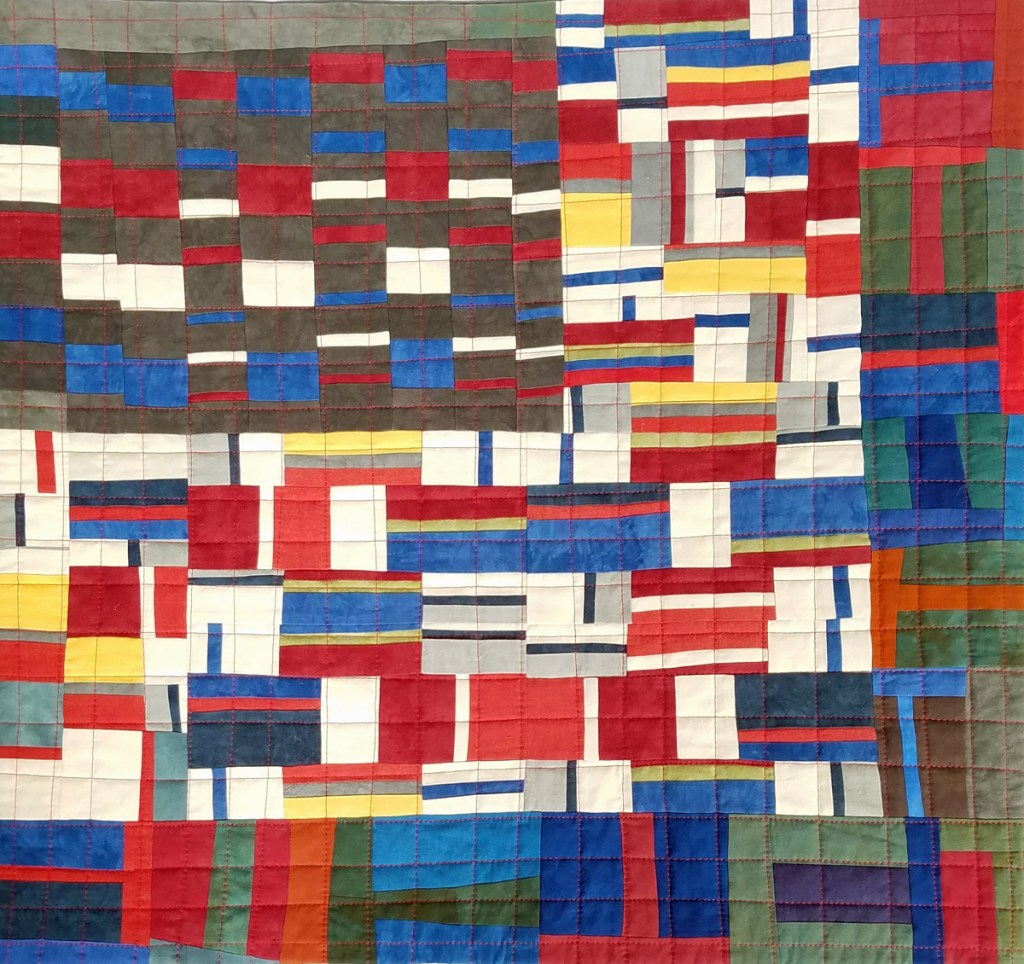
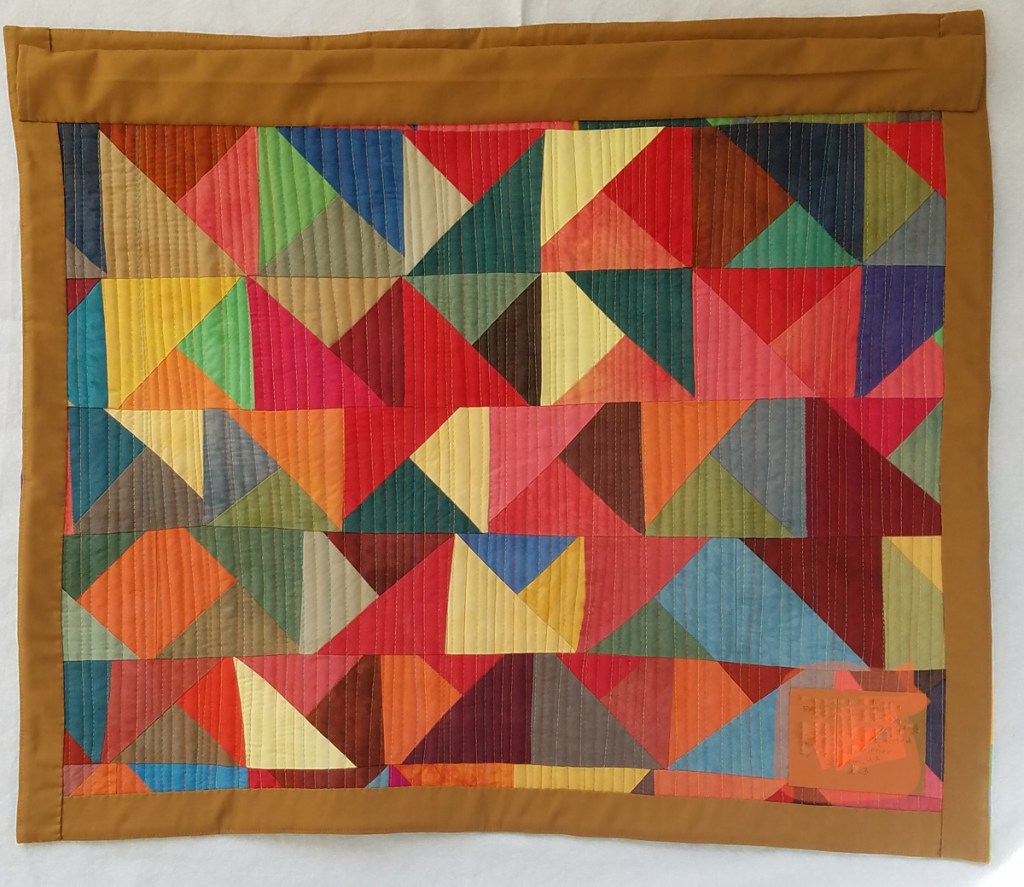
Pat’s son requested something a little different. He went through her orphan blocks and random bits left over from improvisational work. He chose his favorites and asked that I combine them into something new.
I tried to use as many pieces as I could and ended up making two compositions. Both of them have a combination of commercial and hand dyed fabrics.
frontback
frontback
All of the quilts included a label with a quote selected for the recipient.
I am so grateful to her family for giving me the opportunity to work on these very personal projects. It was such an honor and a special way to hold memories close as I worked through my feelings of loss.
Time to catch up on the past year (or so)! This space is where I record my creative work and the opportunity to tell the stories behind the quilts. Unfortunately, the past year slipped away and if you kind readers will indulge me, I’d like to go back in time and record my quilt finishes in a series of posts.
Two quilts were completed at the end of 2022 which had their beginnings during an online workshop with my friend, Tara Glastonbury, of Stitch and Yarn. She gave us some history of the wagga, a utilitarian quilt tradition unique to Australia. I found useful background information at the National Wool Museum from an exhibition there in 2021-2022. I have always been fascinated in quilts made across regions and cultures by people with limited resources.
Although my fabric resources are not limited, I looked through what I had available and challenged myself to use a wide variety of textiles. My first pull included flannel shirts, felted wool from garments, corduroy, vintage tablecloths and denim.
Picnic wagga
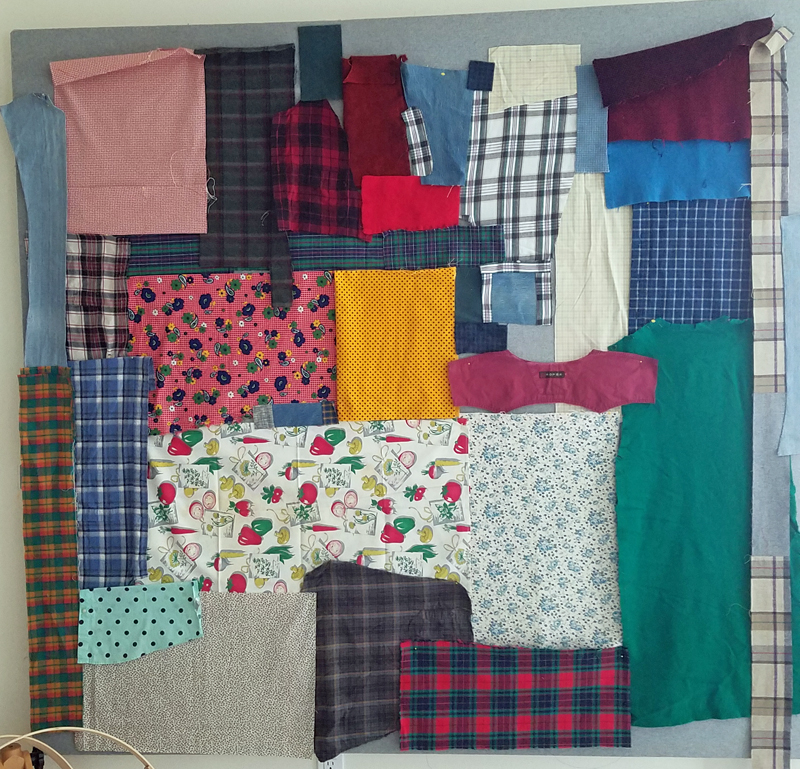
The box containing the vintage tablecloth had a lot of other vintage fabrics including some table linens and aprons from my grandmother. After editing my selections, my new fabric pull looked like this.
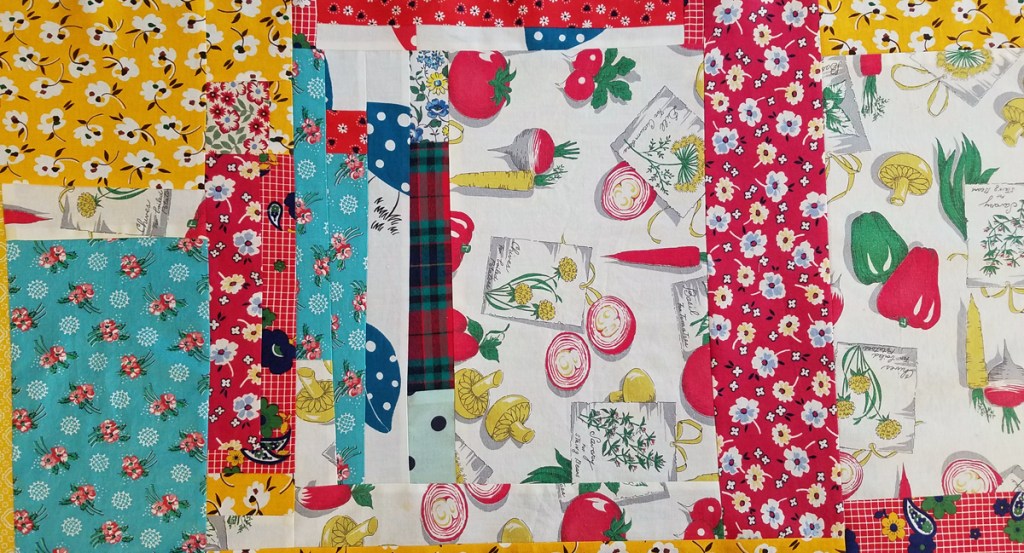
Using scissors and no rulers or measuring tools, I used improvisational piecing techniques to create the top. I tried to leave fabrics their original shape and size, just trimming off what was necessary to puzzle them together.
Several yards of a yellow reproduction fabric (purchased when a local quilt shop closed back in the ’90s) and some bits leftover from the top were pieced together for the backing.
I felt good to piece lots of small batting scraps together before thread basting. It was hand quilted and bound by turning the backing over and stitching it onto the front.
The whole project took less than a month to complete, which is super fast for me! It felt so good to use these fabrics in a new way and I think it will be a perfect picnic quilt. An outdoor photo session kept the horses and cows curious about my activities.
Quilt details:
Picnic Wagga
59″ x 81″
repurposed fabrics
machine pieced
hand quilted
Cozy wagga
I decided to make a second “modern wagga” with some of the flannels and wool fabrics from my original pull using a different approach.
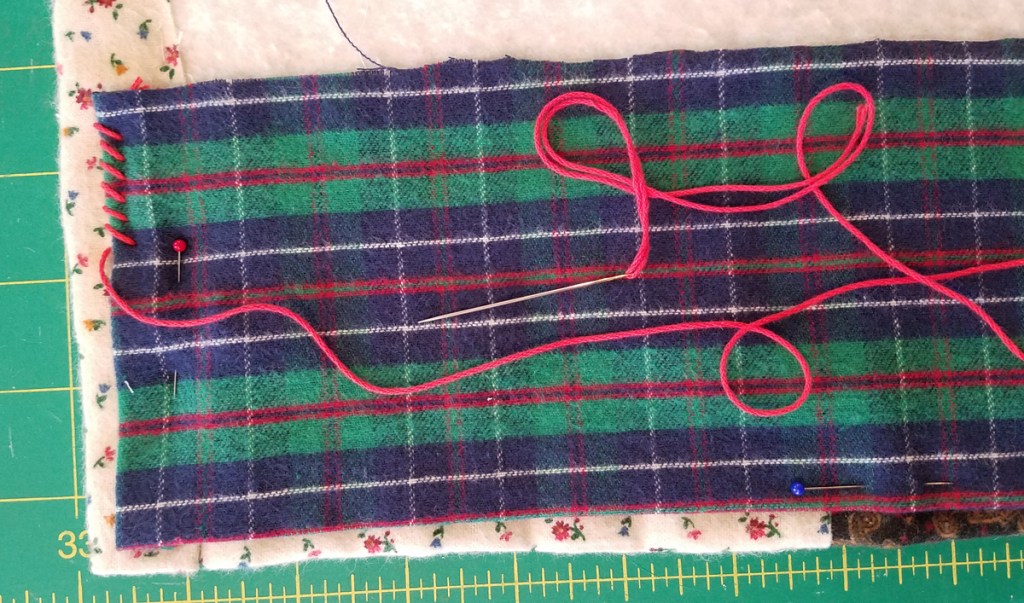
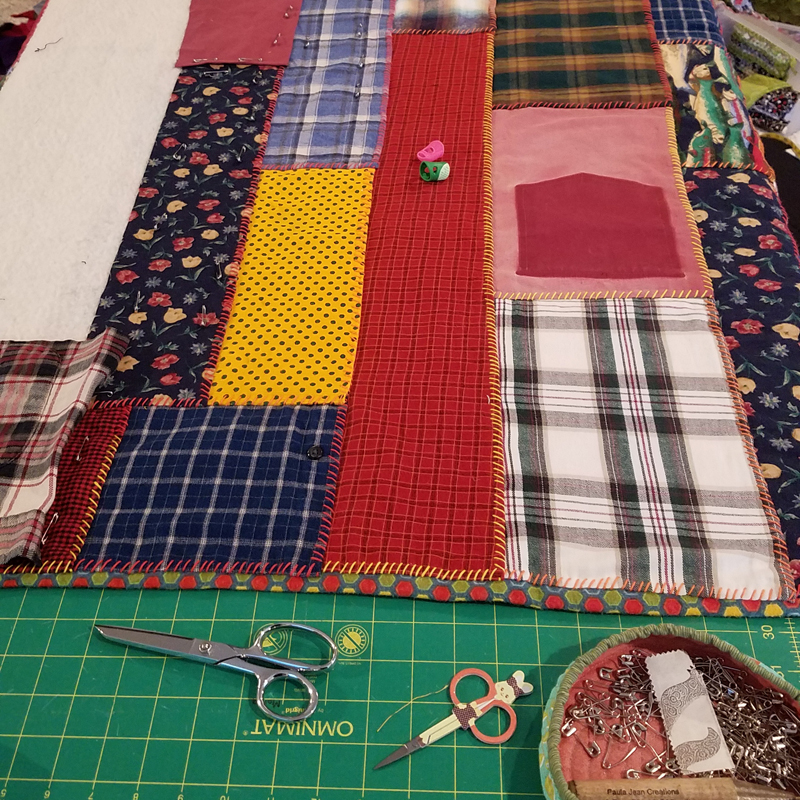
First, I used a flannel top abandoned early in my quilting career to provide the main portion of the backing. I added some fabric to the edges to make it larger, and then basted it to a wool batting, with the edges turned to the front and stitched down. Each piece was added using a thick Sashiko thread to whip stitch through all the layers. Using this approach, the quilt is completely quilted and bound when the last piece is added.
First piece applied, stitching the two finished edges.
I used three colors of Sashiko thread and mostly flannel, felted wool, corduroy and chambray from my collection of previously worn garments.
Placing the next piece or two by covering raw edges and whip stitching the turned edges, the quilt grew quickly. I used scissors to cut rectangular pieces many with pockets, buttons and buttonholes.
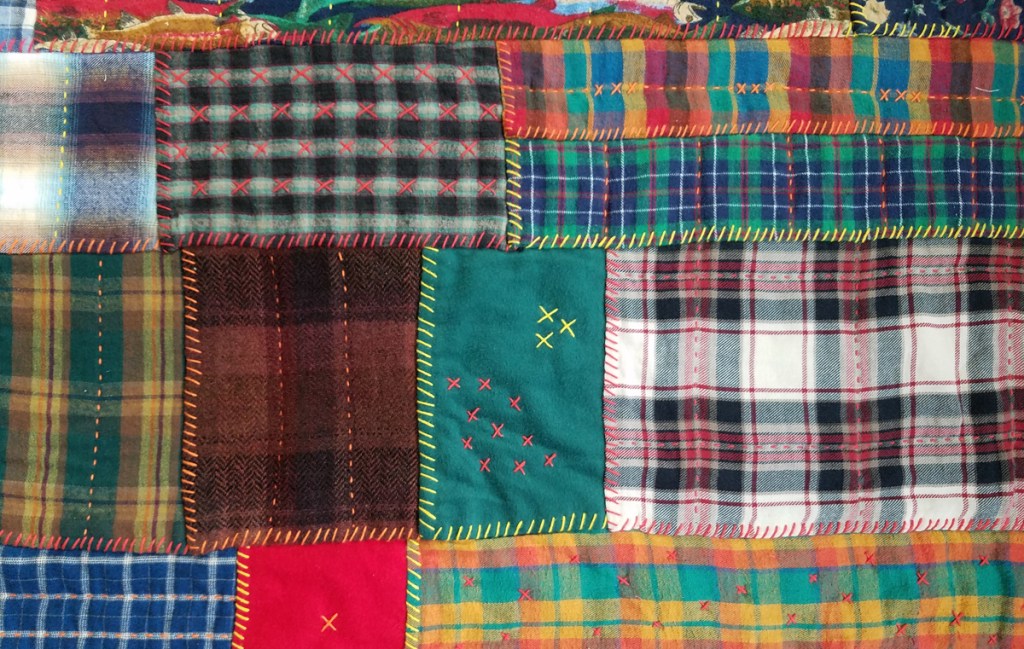
Even though the quilt was technically complete when the last piece was added, I decided to add additional stitching since most of the pieces were rather large. I also stitched pocket openings closed and stitched over buttonholes because this quilt will get lots of wear. (Besides, it was so warm and cozy sitting underneath it in December, I was thoroughly enjoying the stitching.) This quilt is completely stitched by hand and was also completed in less than a month!
detail of front
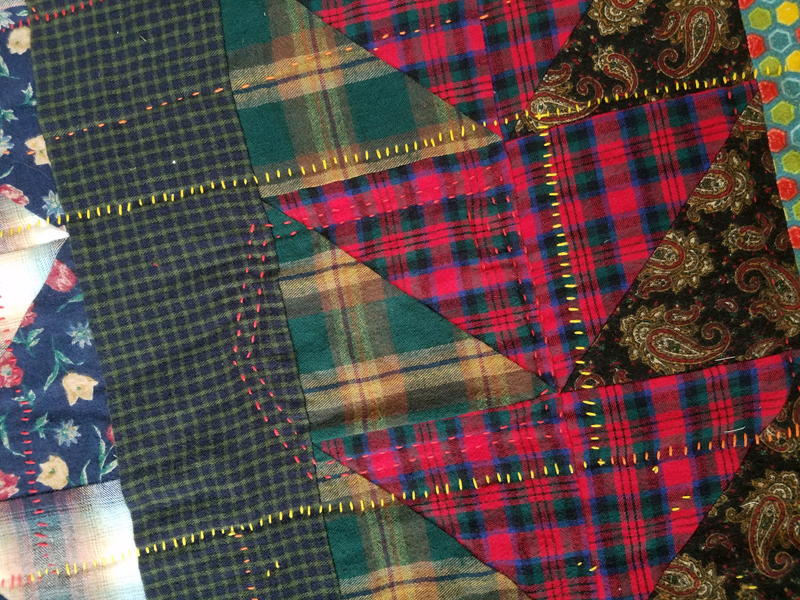
detail of back
A dry day in January, and a walk with a friend to the Dungeness River Nature Center, was a perfect photo opportunity.
Quilt details:
Cozy wagga
47″ x 67″
hand pieced
hand quilted
upcycled fabrics and wool batting
Many thanks for Tara for the workshop and sewalong inspiration! I thoroughly enjoyed using different materials and methods to create personal, utilitarian quilts.
The quilt I’m sharing today is very different from Tiny Bubbles, in style, technique and process. I’m thrilled to announce that it is also headed to QuiltCon in Phoenix next month.
Crevices (40″ x 45.5″) machine pieced, hand quilted
Crevices began in a virtual workshop with Maria Shell @talesofastitcher which focused on freehand curve and circle techniques. The class was a sampler, but I was particularly intrigued by a technique Maria calls “braided curves”. I pieced a lot of these rectangular units using a controlled palette and began the task of creating a composition.
After about a month of manipulations on the design wall, I decided to edit out many of the units. As I worked, an image of light streaming into a canyon emerged in my mind.
Representational art is not my style and I struggled with how to create the abstract feeling of sunlight on geological structures without it becoming too literal. The palette also felt constrained, so I began adding in new shades as I pieced in additional curvy lines. This exercised my brain in such a good way!
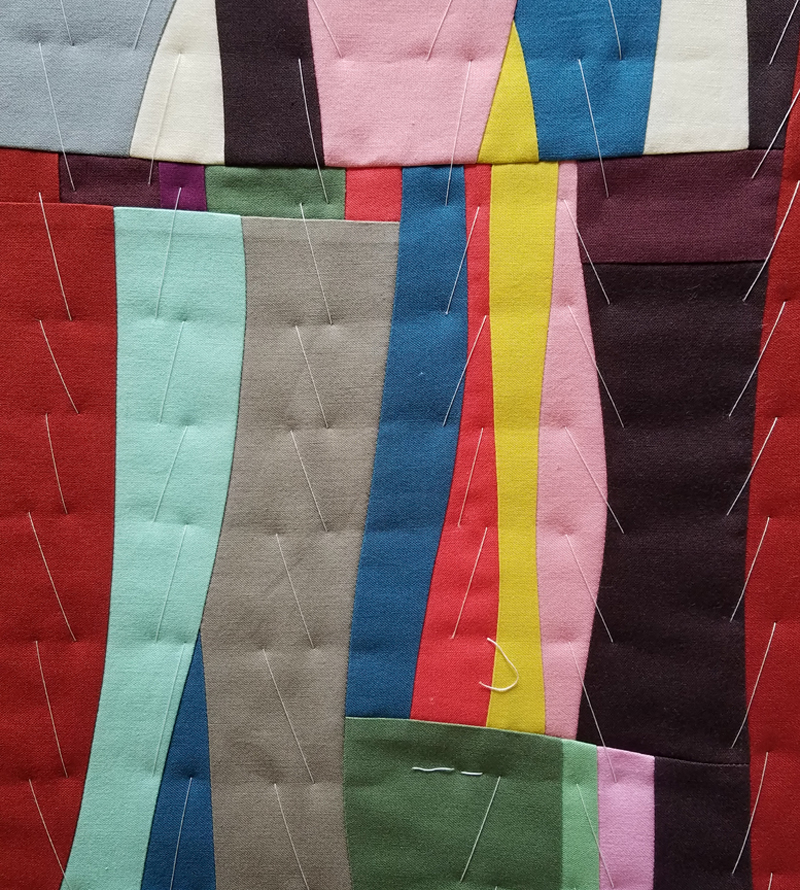
Thread basting is my preference when hand quilting because I don’t like to snag my thread on pins.
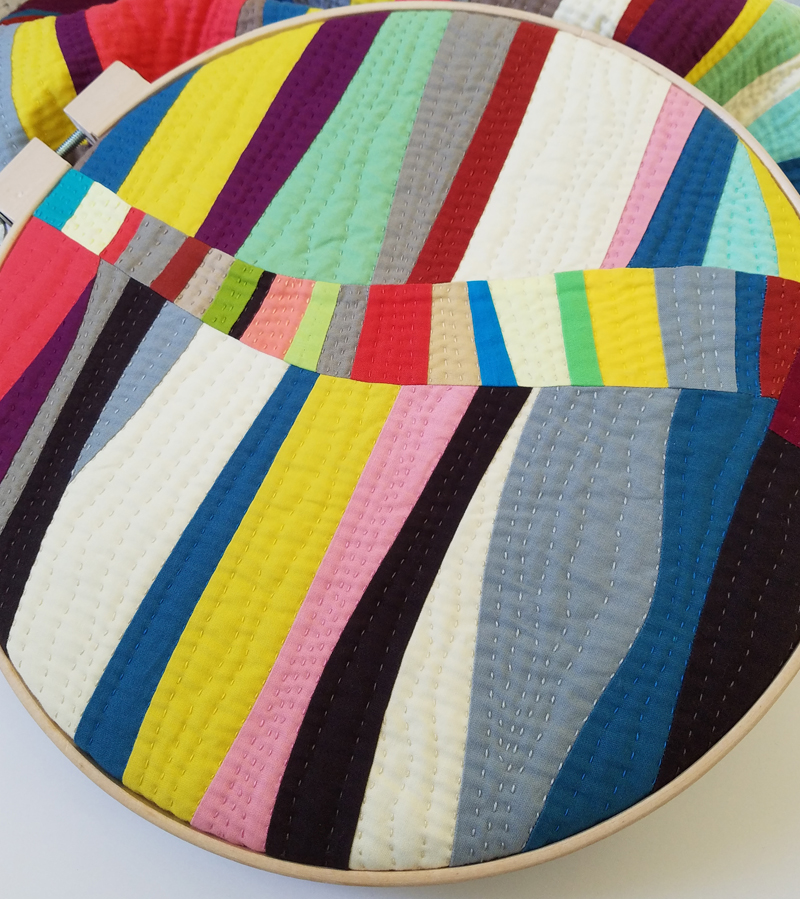
The large, curved spaces invited me to add texture by hand quilting. It was so relaxing to stitch these wavy lines using a variety of perle cotton threads.
Originally, I had planned a faced edge, but in the end I decided to go with a pastel binding. I like the way it frames the piece, bringing the lighter shades from the center of the quilt out to the edges. (In real life, the binding is much straighter than the photo would suggest, I promise!)
And what did I do with all the pieces that were edited out of this composition? I created another quilt.
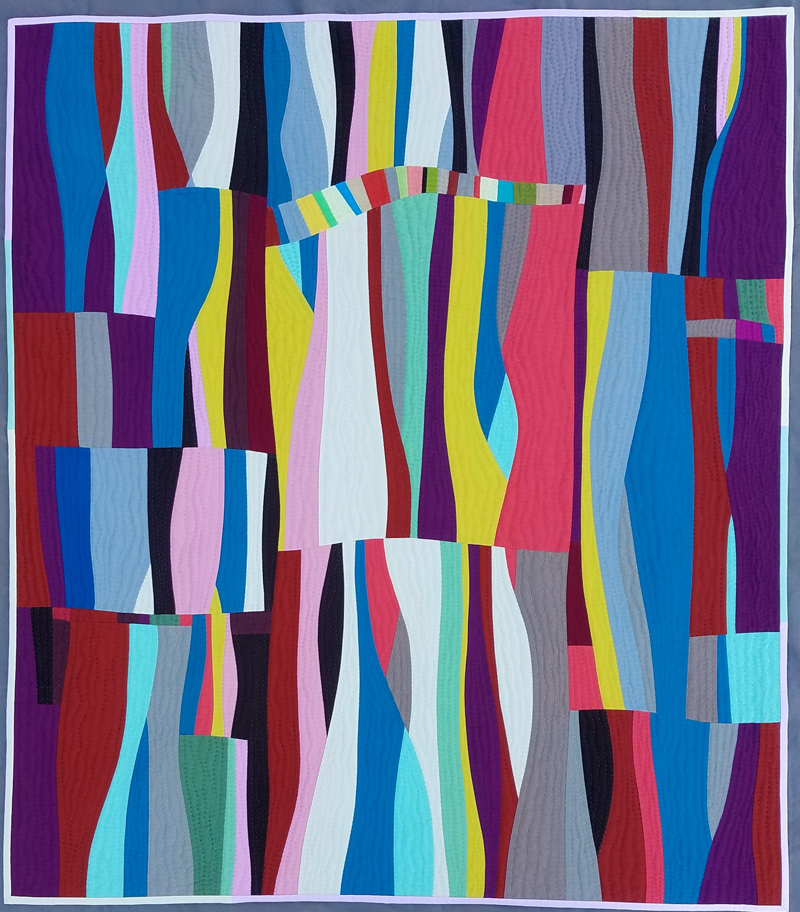
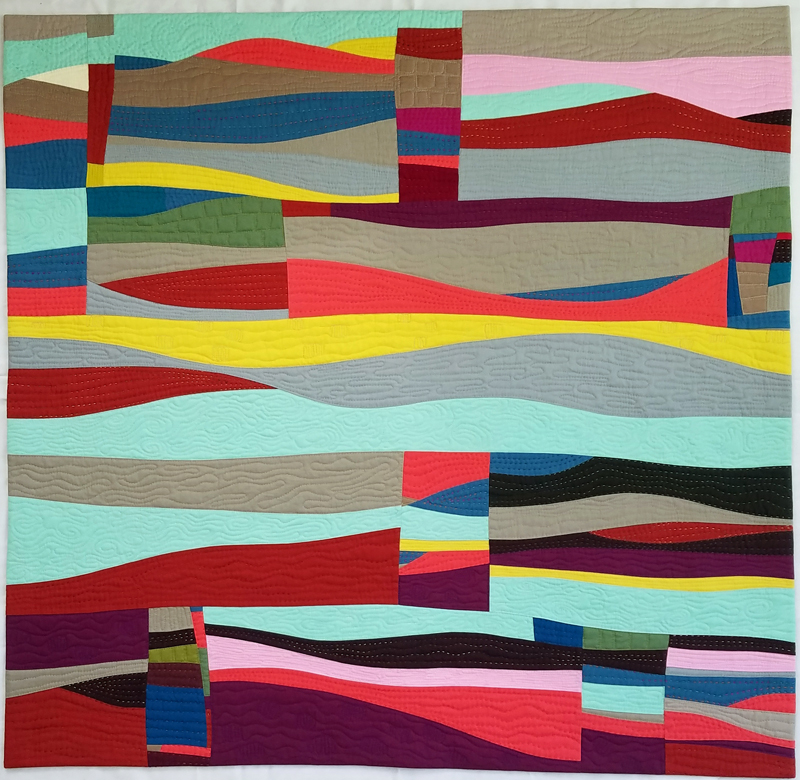
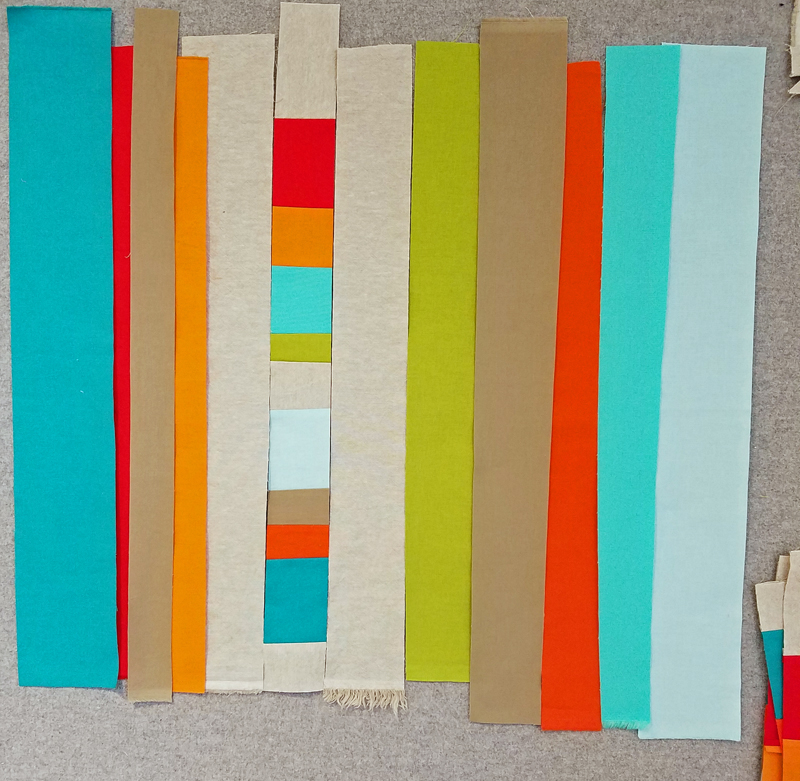
Placing the strips in a horizontal orientation, images of mountains, streams and valleys emerged. For this piece, I challenged myself to work quickly and intuitively, restricting myself to using the leftovers from Crevices. Meander is the result.
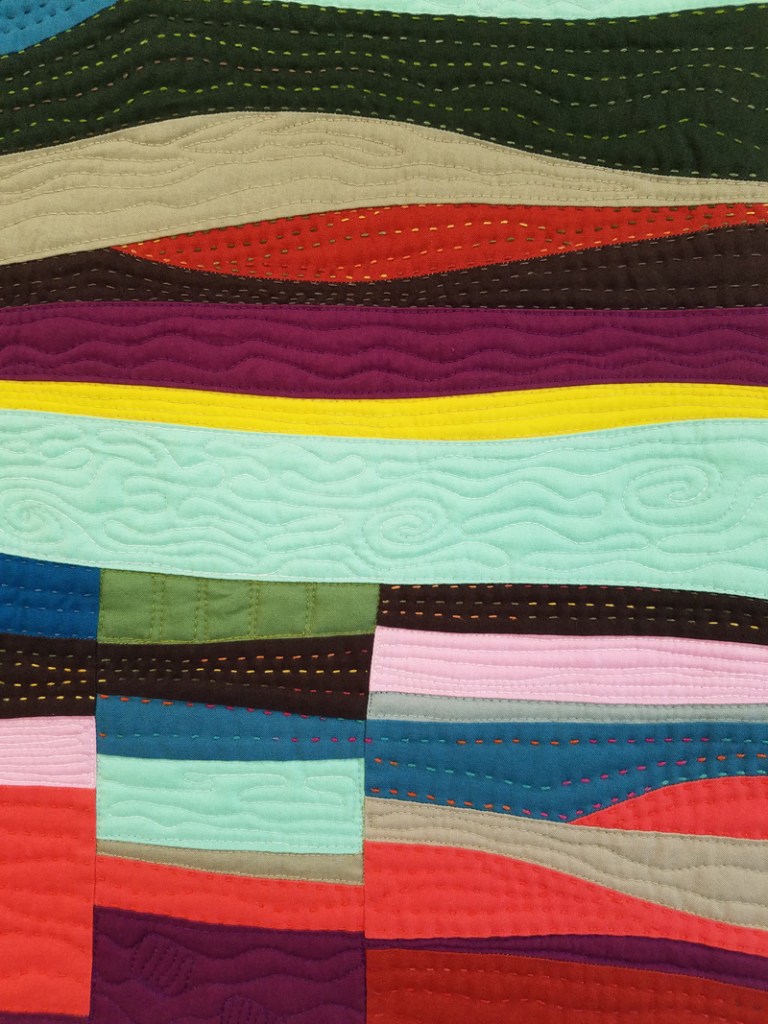
Meander (38″ x 36.5″) machine pieced, machine and hand quilted
Improving my free motion quilting skills is an ongoing goal of mine. I explored some organic filler designs and used many motifs from Christina Cameli‘s book, Step-by-Step Texture Quilting. Lots of thread changes and adjusting the motifs to fit the shapes took all of my concentration. About half way through, it was beginning to feel flat and stiff from all the dense quilting. Adding in sections of hand stitches softened the texture.
And what did I do with the leftovers? I still had lots of odd bits that I was determined not to add to the scrap bins, so potholders to the rescue! I donated these to the Friends of the International Quilt Museum to sell in the gift shop as a fundraiser.
Whenever I take a technique workshop, I feel that it shakes things up in my studio. Since I rarely use strip piecing techniques, creating these large units initially felt very quick and satisfying. However, I found it challenging to shape them into compositions. Every quilt teaches me something new!
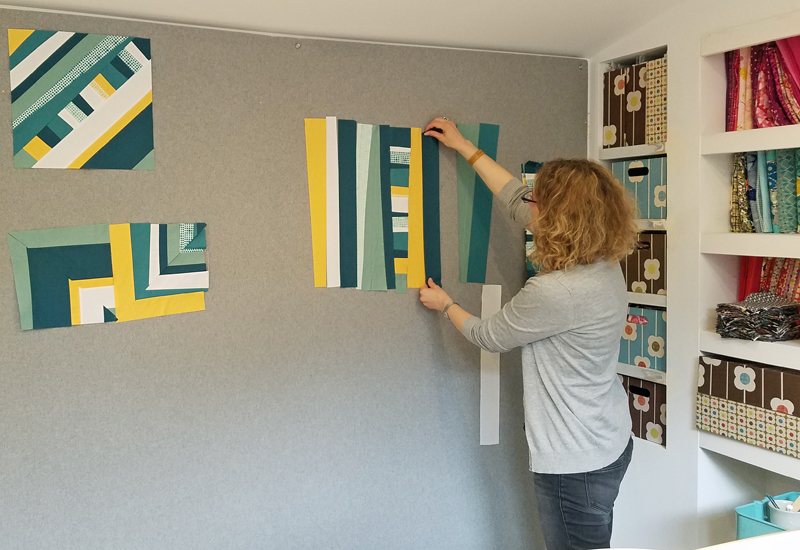
After viewing many of Katie’s wonderful quilts using this block, we each came up with a plan and began creating strip sets.
After the strips were pieced, we cut blocks from each set.
Daniela arranging a new strip set
When the blocks are cut, they create lots of “waste” triangles as seen in the center of the photo
Back home, I created a few more blocks and decided on a layout for my quilt.
After deciding to hand quilt, I gathered my perle cotton threads and began the lovely, SLOW process of adding texture to the quilt.
detail of the quilting from the back
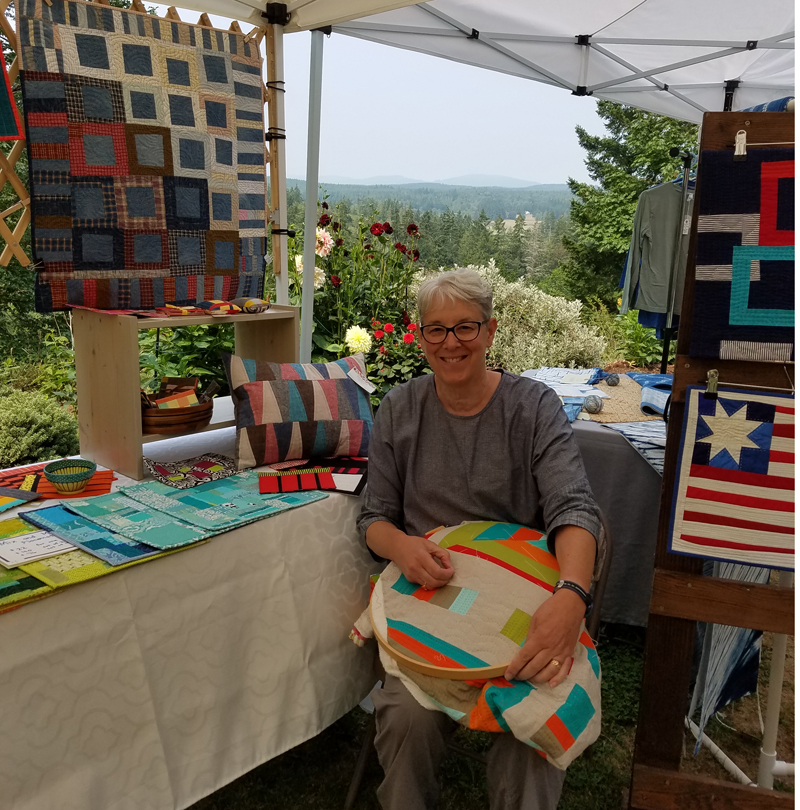
I tend to hand quilt in spurts, here and there when I have time. It is the perfect portable project. This quilt has traveled on long road trips and made an appearance at several events. Every stitch helps move the project along.
Stitching and enjoying the view at Egg & I Pottery during the Port Townsend studio tour.
When the quilting was eventually finished, I decided to use yarn dyed linen for the binding. I tried something new (for me) and did some visible stitching to attach the binding on the back. It was fun to change thread colors as I went around the quilt using 8 wt perle cotton.
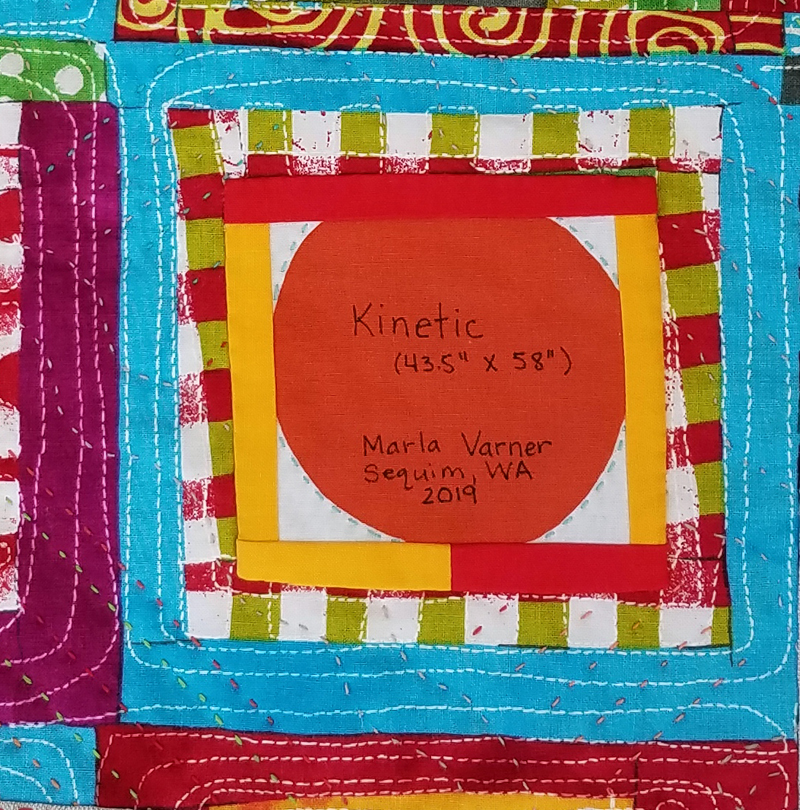
All it needed was a name and a label and just like that (lol), a finished quilt almost two years in the making.
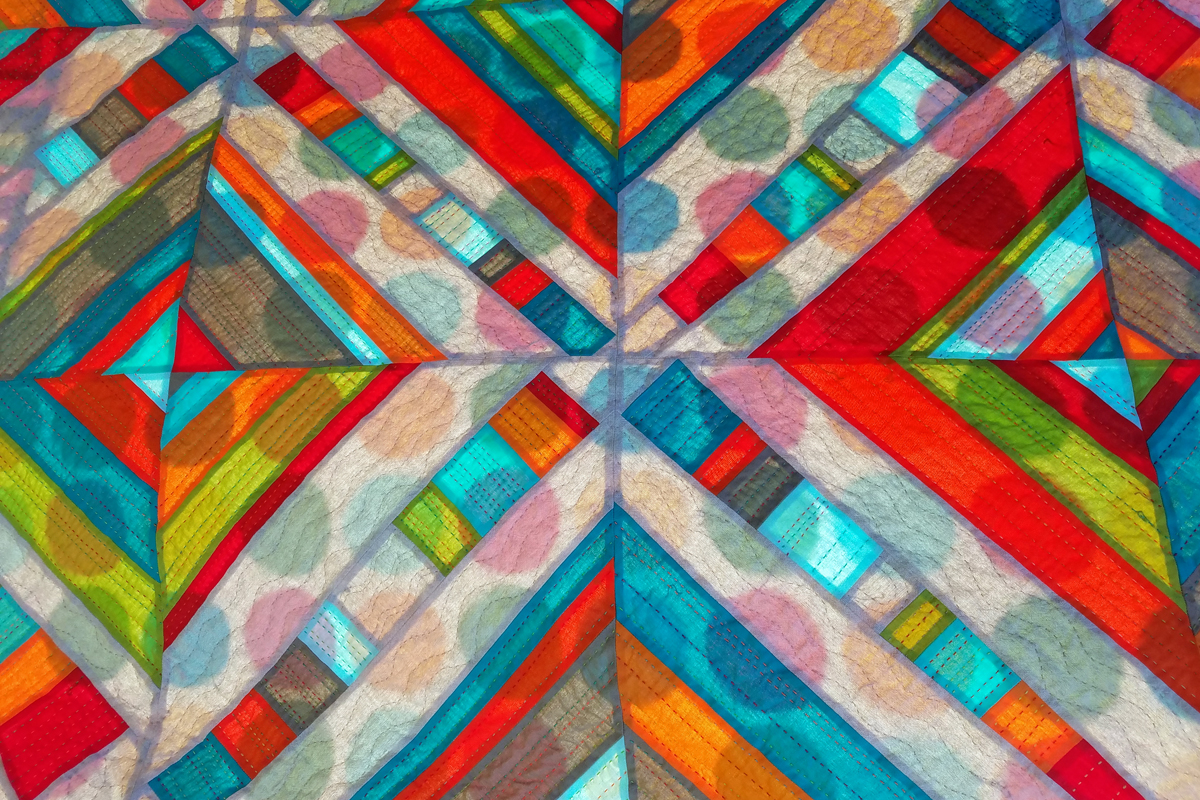
Kinetic (43.5″ x 58″)
Love this view with the sun shining through the layers. I think it looks downright psychedelic!
Now that this one is finished, I am free to start playing with those leftover triangles…
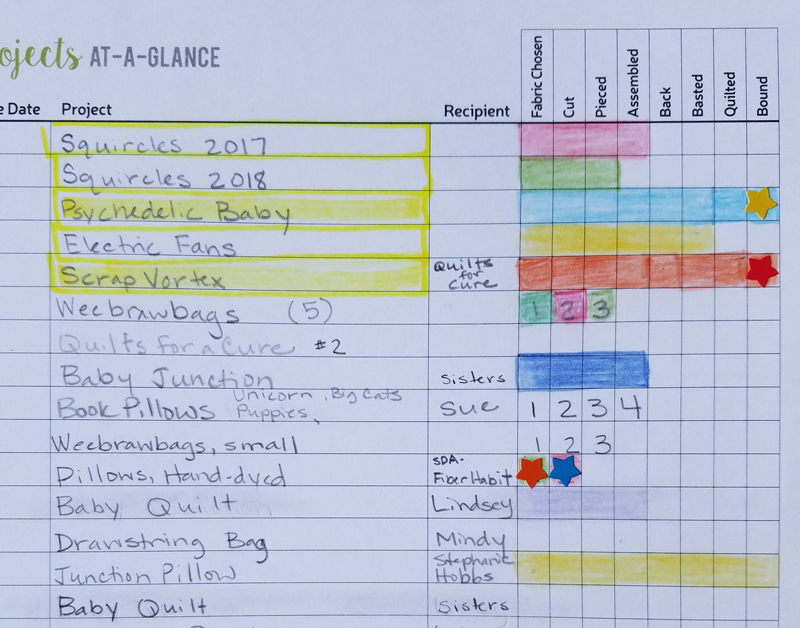
Our quilting community is so generous and supportive. I came home from QuiltCon 2019 in Nashville inspired and energized (well, after I recovered)! Two long-standing projects had been inching towards a finish, and both were completed this week. Hooray! I’ll share one quilt in this post and the other in a separate post soon.
The five highlighted projects at the top were carried over from previous years.
The first quilt’s humble beginnings began more than four years ago as a way to get my multicolored print scraps under control. Amanda Jean who blogged at Crazy Mom Quilts wrote a post about her Scrap Vortex quilt in 2013 that inspired me. She also hosted a quilt along in 2015, so if you are interested there are lots of photos and instructions available. Occasionally, I would piece a slab or two, but the piecing was never high on my UFO priority list.
On the design wall, April 2018
In January, I won an edge to edge quilting during an Instagram giveaway from Lilo Whitener-Fey with Trace Creek Quilting. Her company specializes in t-shirt and memory quilts, as well as longarm services. We decided to have her quilt a top and we would donate it to a charity.
I looked around for a top to finish and my scrap vortex came to mind. Lots of little scraps were used and I love to remember how each piece has been used in past projects. Of course, the quilt somehow didn’t diminish the scraps in the tub, but that seems to be the way with scrap quilts. The good news is I can make another one (or two or six)!
Lilo provided the batting and quilted the top with a pattern called Geometric Path. Her turnaround time was very quick, she communicated efficiently and I appreciate her generous donation of time, batting and even return shipping. Check out Trace Creek Quilting for pricing and details and follow her on Instagram and Facebook to learn more about their quilts and services. All I had to do was trim it up and attach a binding and label.
Finished size (51″ x 65″)
Since this quilt is so cheerful and has lots of prints, we decided to donate our joint project to Quilts for Cure. Their mission is to provide “quilts full of hope, love and smiles to kids fighting cancer”. I met organizer, HollyAnne Knight at a previous QuiltCon and have participated in her annual “Operation Smiley” project which is happening now. Maybe you would like to contribute, too? There are lots of ways you can help this organization. Donate a quilt, donate quilting or donate money to help pay for materials and shipping. My hope is to donate at least one quilt each year to their cause.
A beautiful Alexander Henry butterfly print made a colorful backing
The quilt has been washed in a fragrance and dye-free detergent per instructions and will be mailed tomorrow. I sincerely hope it brings a bit of cheer to a child facing the challenges of cancer.
It’s February which means it’s almost time for QuiltCon, the Modern Quilt Guild’s annual show and convention. I thought I’d share the backstory of, “At the Junction”, which will be on display in Nashville.
Back in May, I took a Free-Form Blocks workshop from Sujata Shah at Quilted Strait. We explored Sujata’s method of cutting several layers of fabric to construct a variety of unique blocks. I was looking for some faster improv techniques, as well as to spending time with Sujata and her gorgeous, colorful quilts. Her book, Cultural Fusion Quilts: a Melting Pot of Piecing Traditions, is a wonderful resource if you want to learn more.
The first day I used a wide variety of solids to make some of the sample blocks. The second day I decided to limit the palette, thinking I would make a baby quilt out of the blocks I had created in class. (Apologies for the poor indoor lighting, but this is how my design wall looked at the end of the second day.)
However, the block that captured my attention was this one, so when I came home, I separated these out and they became the starting point of a new quilt.
(Not to worry…all those other blocks found their way into pillow covers, placemats and table runners and they gave me lots of free motion quilting practice, too!)
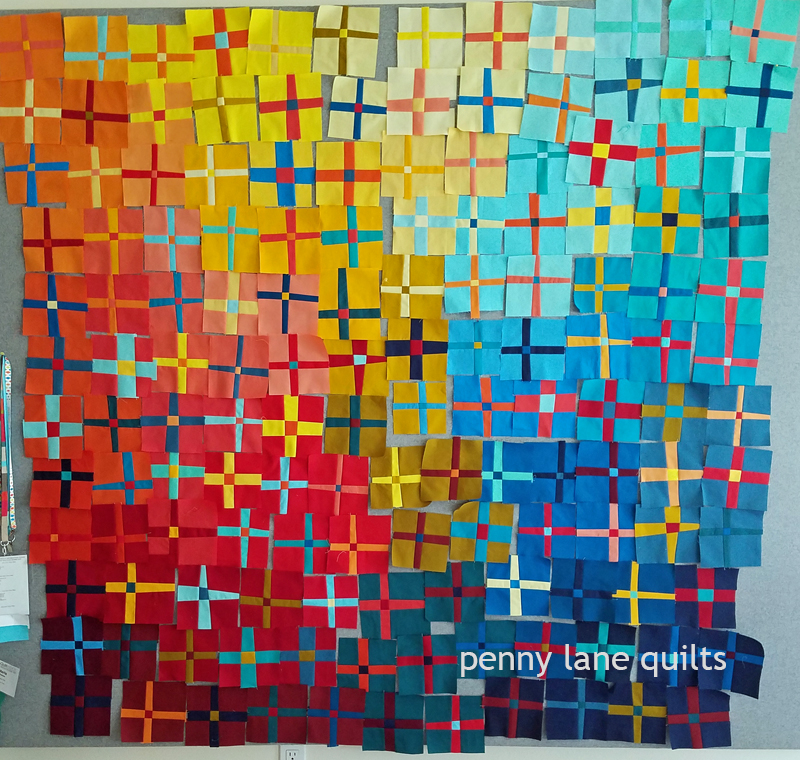
I decided to go with the primary colors and kept making blocks (they were rather addictive and I needed some improv therapy time). Before I knew it, the design wall was full. This was the end of September and I began to think it might be possible to make the QuiltCon entry deadline of November 30.
At this junction (see what I did there?) I needed to make a decision whether to square these blocks up before assembling or to do my usual freehand cutting and puzzling the units together. It had grown larger than any of my other improv pieces and I knew it would be a challenge, but my cheerleaders over on IG encouraged me to not take the easy road!
I pieced it in sections, adding a “safe zone” around the edges so that I wouldn’t lose any of the blocks when I trimmed up the finished top.
Of course, that became harder as the sections got bigger. The final few seams required crawling on the floor, all my cutting mats and some painter’s tape to hold the pieces in place. (In the bottom left corner is a laser square that was a valuable addition to my tool chest!)
By the middle of November, I had the top pieced, basted and ready to quilt. This was the largest quilt I have machine quilted and I had doubts about tackling it on my domestic machine. Originally I planned to quilt it about half an inch apart, but before I knew it, I started quilting much closer than that!
It was a lot of wrestling and wrangling, and some long hours at the machine. It took almost seventy hours to quilt and I used ten different colors of Aurifil 50 wt. The thread colors graduate and overlap from lighter to darker shades.
The dense quilting made blocking essential and the laser square was a big help during this step, too. Soon the binding was attached and all I needed was a sunny day for photos! Well, that didn’t happen, but I did get my entry submitted.
That looming deadline sure helped this quilt get finished! It was challenging and I spent way more time on the floor than was good for this old body, but it helped my skills evolve. I love this quilt and it really felt good to finish a large quilt…it’s been awhile.
I’m looking forward to attending QuiltCon, meeting up with friends and being inspired by all the modern quilts on display. Maybe I’ll see you there?
Mini quilts are such a wonderful way to try something new! I have made several over the past few years, participating in guild challenges, swaps and magazine submissions.
When I discovered Curated Quilts, I was immediately drawn to one of their features . Each issue has a challenge to make a mini quilt with a specific palette that fits a certain theme. Their second issue’s theme was “Log Cabin” and this was the palette.
You can go here to see all of the wonderful minis that were submitted. I love the log cabin block, so that wasn’t too much of a stretch for me, but the colors were definitely a different combo. I decided to explore some of the improv ideas that began in workshops with Maria Shell @talesofastitcher last summer. Here is the mini that I submitted and I was very excited to have it included in the magazine. If you haven’t seen a copy of Curated Quilts, yet, check it out! It is definitely a quality, no advertisement publication.
Summer Cabin (14′ x 14′), machine quilted
The past two years I have participated in the MQG swap and I love the #makeaminimakeafriend concept. Check out the hashtag on Instagram to see many of the quilts that were created and swapped.
A fun feature of this opportunity is that you have the option of swapping in person at QuiltCon. Last year in Savannah, I received a wonderful mini from Sandra Kaye @sandieloves2quilt . That mini started her on a whole new “Happy Dance” adventure and she made a larger version which won a big prize at QuiltCon 2018 in Pasadena!
This year I made “Confetti” for my new friend, Jules @julesquilts, who said she liked pink! You can see the design is a continuation of the ideas I used in Summer Cabin.
Confetti, MQG swap 2018, machine and hand quilted
It was so fun to meet her in person. She made a beautiful mini for me using her hand dyed fabrics and it is quilted with her elegant stitches.
How grateful I am for these two new quilting friends! I love all the little quilts that I have received from friends over the years. They decorate our home and are daily reminders of our friendships.
Today I am working on a mini for the Bainbridge Island MQG’s annual challenge. The theme this year is “Log Cabin” and it is a good opportunity to finish up an idea that has been languishing on the design wall since last summer. (And it’s another project where I can practice my free motion quilting skills.)
Thanks for reading. I hope you have a mini (or two) in your future. They are small, but they might lead to something big!
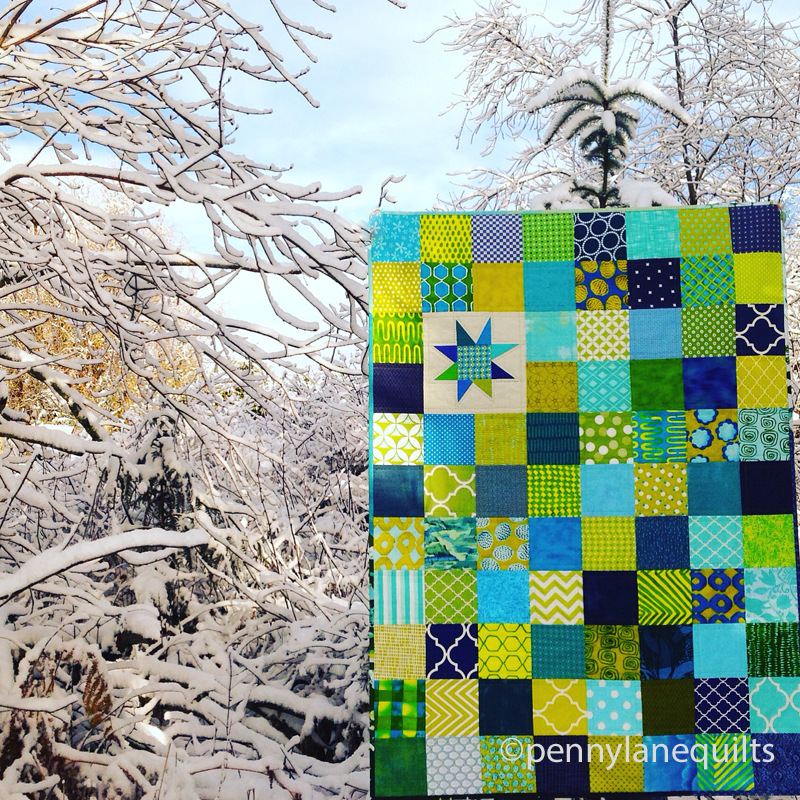
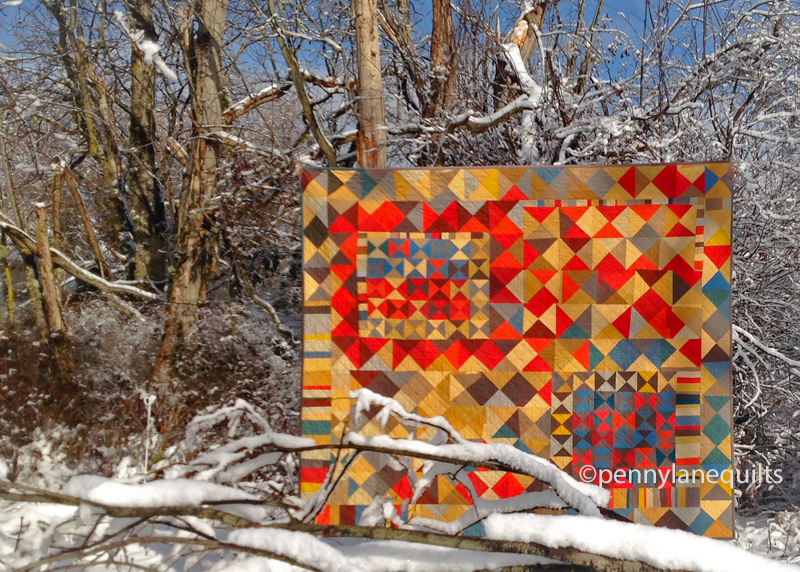
Our winters are mild, so snow days are a novelty. This week I took advantage of a sunny morning and a lovely, snowy backdrop to take a few quilt photos.
Zig Zag Chevron (HSTs from charm squares, hand quilted)
One of my goals for 2017 is to improve my photography skills. Of course, this means learning how to use editing software. I’m trying to check out some of those helpful tutorials in the process.
My first finish of 2017: baby quilt made from charm squares + a wonky star
The photo pictured above was edited for Instagram using a mobile app.
Hourglass Bedazzled, improv piecing, hand dyed fabrics, machine quilted
This quilt was the last one I completed in 2016. It is my most complex quilt to date that uses improvisational piecing, and I hand dyed all of the fabrics. I don’t think I ever properly documented it, but a few photos appeared on Instagram during the months that it was in process.
On another note, QuiltCon is right around the corner! Our newspaper, the Sequim Gazette, was kind enough to write an article about the local quilters who will have quilts in Savannah. They even sent a photographer out to capture me in my own environment. Those of you who are curious and have bugged encouraged me to include photos of myself on this site, can check it out.
It is snowing again today, so I’m off to curl up with a cup of tea and some hand quilting. I’m on the home stretch quilting the mini for my partner in the MQG swap.
A confession…I love leftovers, both food and fabric! They give me an opportunity to be creative, I feel virtuous for not being wasteful and sometimes they even save me a little time.
Here are a few recent finishes that began as orphan blocks, trimmings or bits and pieces floating around the scrap bin and design wall.
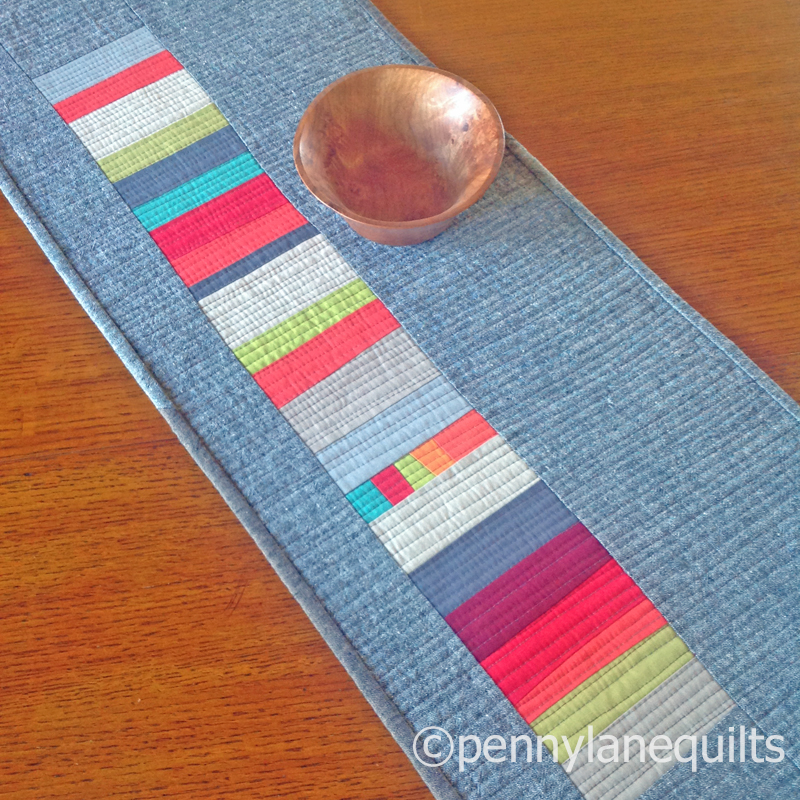
Some leftover strips became a table runner.
Essex yarn dyed linen + commercial solids for the stripes
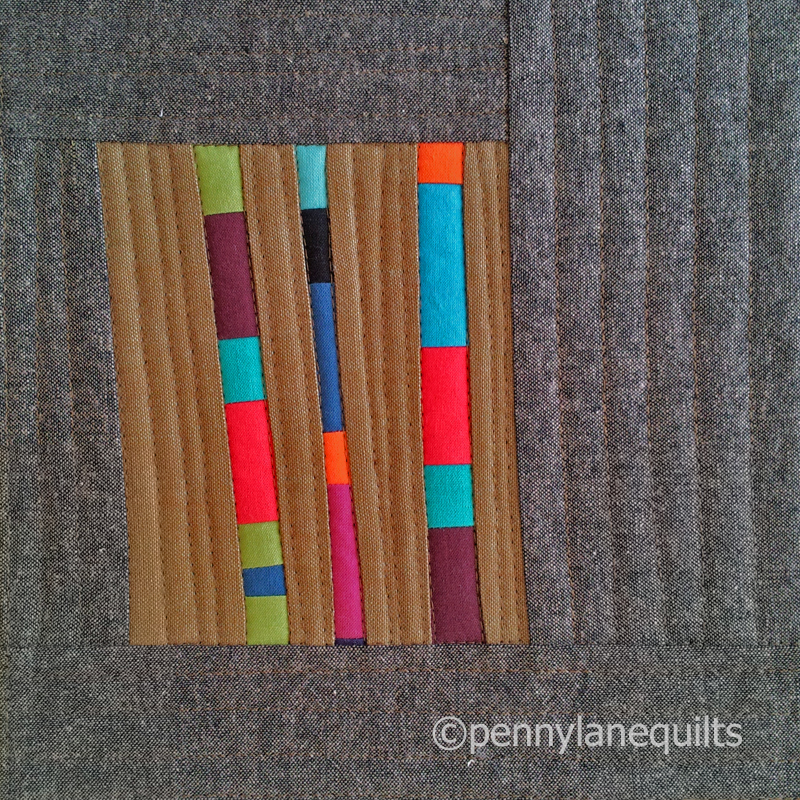
A few orphan blocks became a pillow and a table mat.
orphan blocks + Essex yarn dyed linen
another orphan block + Essex yarn dyed linen
And sometimes everything “clicks” and a few units that have been marinating for a long while are the impetus for something that keeps me exploring, and revising, and reworking until it makes me very happy!
“jubilant”, hand dyed cottons, Essex yarn dyed linen, matchstick quilting
So, the moral of the story is… save all those leftover bits because you never know when they will be just what you need to get your next project started!
(The table runner and place mats in the featured image began as some odds and ends from the recent Riley Blake challenge.)
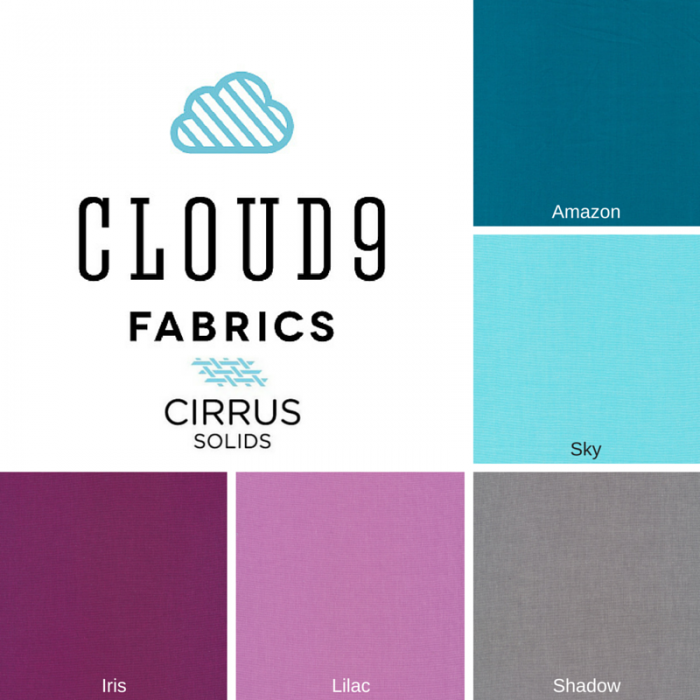
Welcome to the second day of the 2016 Cloud9 New Block Blog Hop!
It is so exciting to be part of the block hop, sponsored by Cloud9, and hosted by Yvonne of Quilting Jetgirl, Cheryl of Meadow Mist Designs and Stephanie of Late Night Quilter! There are almost 70 bloggers designing blocks using the fat quarter bundle of lovely organic Cirrus Solids generously provided by Cloud9 fabrics. The hosts chose this palette for the hop, called “Berry Harvest”. I decided to use four of the colors, leaving “Lilac” out this time around.
My block, Woven Berry Basket, is an improvisational block based on the traditional basket weave design. It uses a free form cutting technique (a.k.a cutting without a ruler).
The goal of this tutorial is to introduce you to this technique. There are two main principles that I use in improv piecing:
if it is too short, add on
if it is too long, cut it off
Your block will not be exactly like mine, but I will describe a process that you can use to make one that is similar in design.
Tips for improv piecing:
A rotary cutter with a 60mm blade is my preference for free form cutting
Set the stitch length on your machine a little shorter than usual
Cut 4 strips 5 in x 18 in (approx) Here’s your first chance to cut without the ruler!
free hand cut the equivalent of 4 strips approx 5 x 18 (notice the cut is straight-ish)
2. Free hand cross cut strips that vary from about 1 in – 2 .25 in width from each strip
I like to cut each strip individually, some are slightly angled, but most are straightish
3. Stitch 9 pairs of strips together, varying the colors and widths.
chain piece 9 sets of strips, no need for pins, just go slowly and align the edges as you go
4. Press seams to the darker fabric
variety of widths and color combinations
5. Add a third strip to each set, again varying the color placement and width of strips.
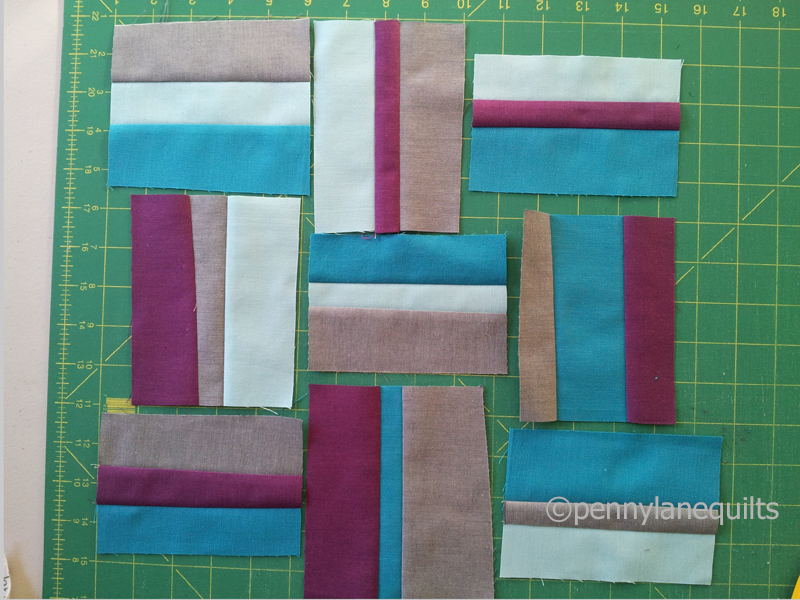
6. Lay out the 9 units in an alternating vertical, horizontal pattern.
To end up with a 12.5 unfinished block, we will aim to have each unit be at least 4.5 in on each side before assembling. (I trimmed the ends to even up the units.)
*At this point, you will need to start making decisions based on how your units are sized. I will attempt to describe how I solved the puzzle.
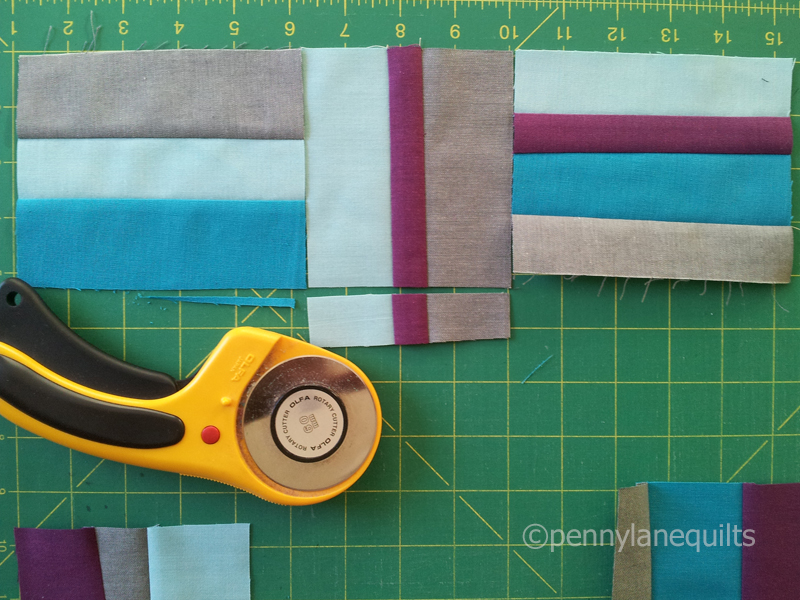
For the first row, I decided to cut the bottom off the middle unit, and add a strip to the third unit.
If it’s too long, cut it off and if it’s too short, add on!
I followed the same procedure for the second row:
a strip added to the middle unit
But when the units were assembled, the second row was shorter than the first, and I was aiming to have each row approx 13 in wide so that I would be able to trim it down to 12.5 in. What to do? Add on!
I used the cutting mat measurements to see if the overall width was about 13 inches
To assemble the rows, I trimmed the top edge of the second row, then overlapped it onto the bottom of the first row (right sides facing up). Using that cut edge as my guide, I trimmed the bottom of the top row to match.
*use the ruler to stabilize the edge, but do not use it as a cutting edge
Follow the above procedures to assemble the third row and attach.
Can you see how I am cutting along the edge of the row, not along the ruler edge?
If your block is big enough, just trim to 12.5 in square and your block is complete. If it is too small, improvise! You might add some strips to form a frame, and then trim.
Success! Trim to 12.5 inches and you’re finished.
Here is my finished block:The thing I like best about improvisational work is that you are engaged making design decisions throughout the process. *Warning: this may be addictive! As I work, I find myself asking lots of “What if?” questions:
What if I cut the strips wider (or thinner)?
What if I used 5 colors?
What if I only used 2 colors?
What if it was scrappy?
What if the units were smaller and I made a 4 x 4 grid?
I hope you will give this a try, and that you will enjoy the process as much as I do. If you make a block, I’d love to see it! For those on Instagram, tag your photo @pennylanequilts and use the hashtag #wovenberrybasket.
Thanks for stopping by! I’d love to hear your thoughts and answer any questions you may have.
And don’t forget to enter the Giveaways! Visit each of our wonderful hosts for the chance to win 3 separate fat quarter bundles of beautiful Cloud9 Cirrus Solids.
Be sure to check out the rest of the stops on the hop. You’ll be glad you did!