Tag Archives: improv

Crevices

The quilt I’m sharing today is very different from Tiny Bubbles, in style, technique and process. I’m thrilled to announce that it is also headed to QuiltCon in Phoenix next month.

Crevices (40″ x 45.5″) machine pieced, hand quilted

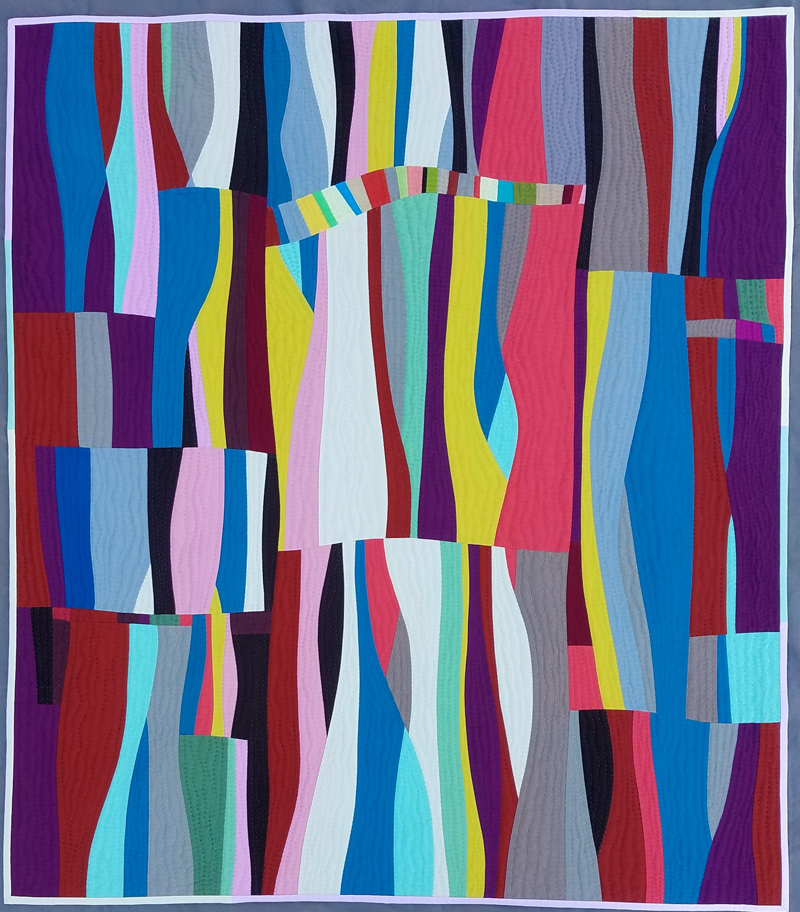
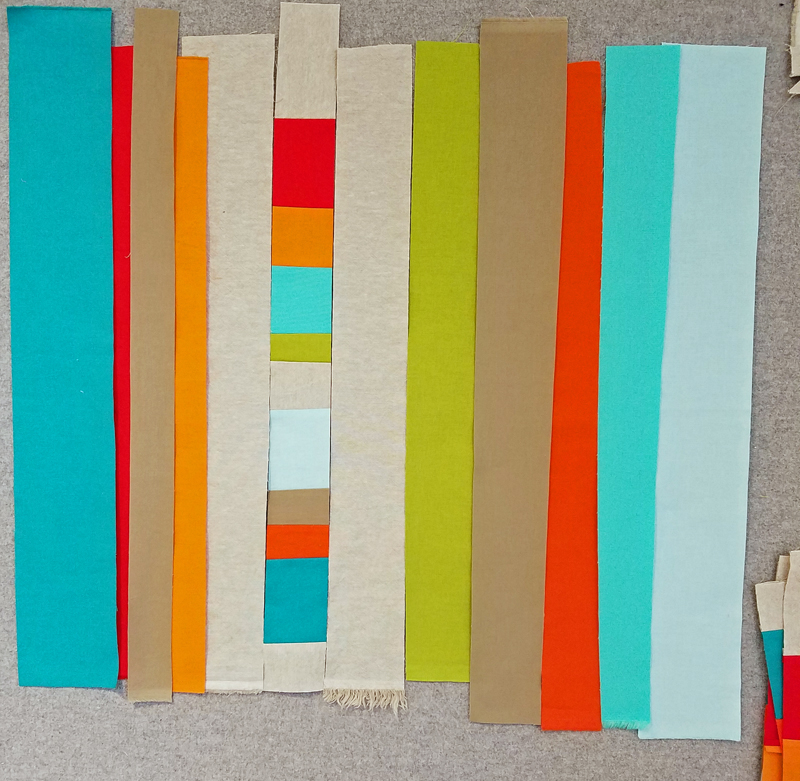
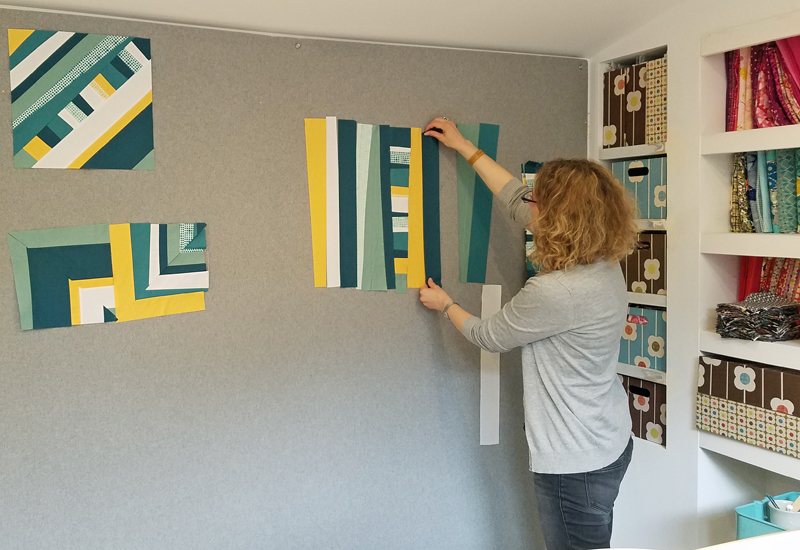
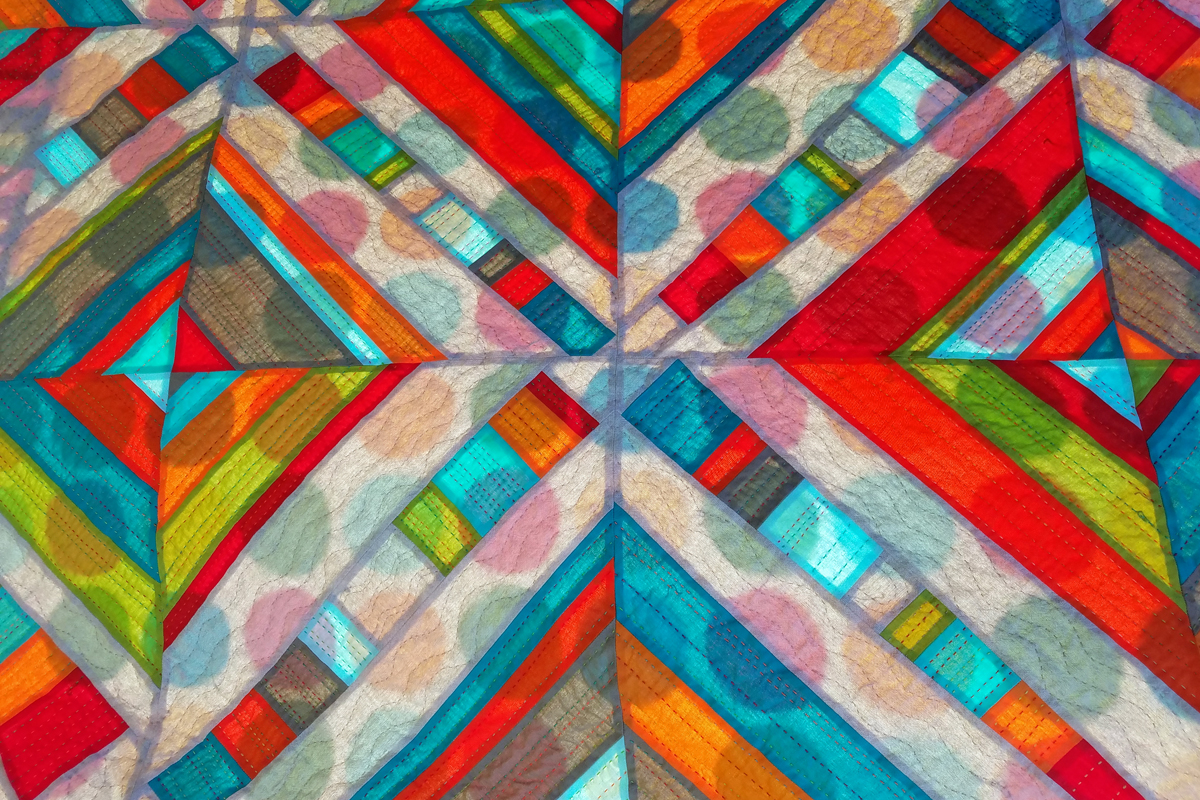
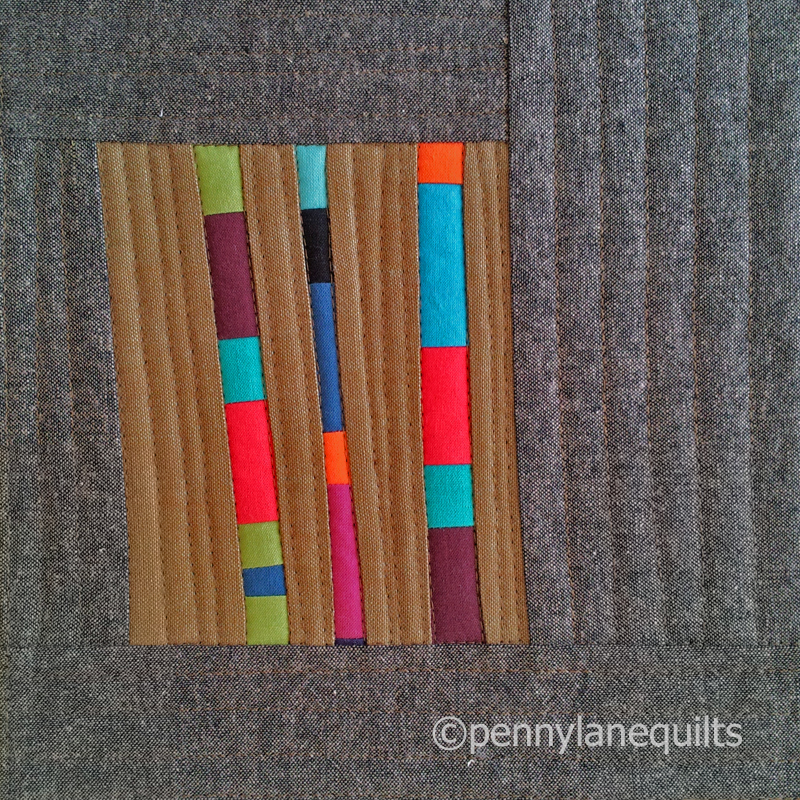
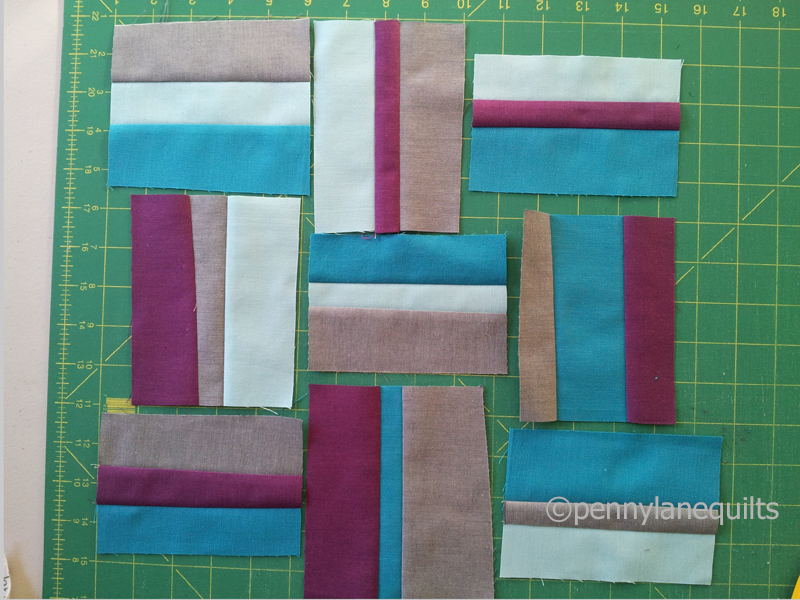
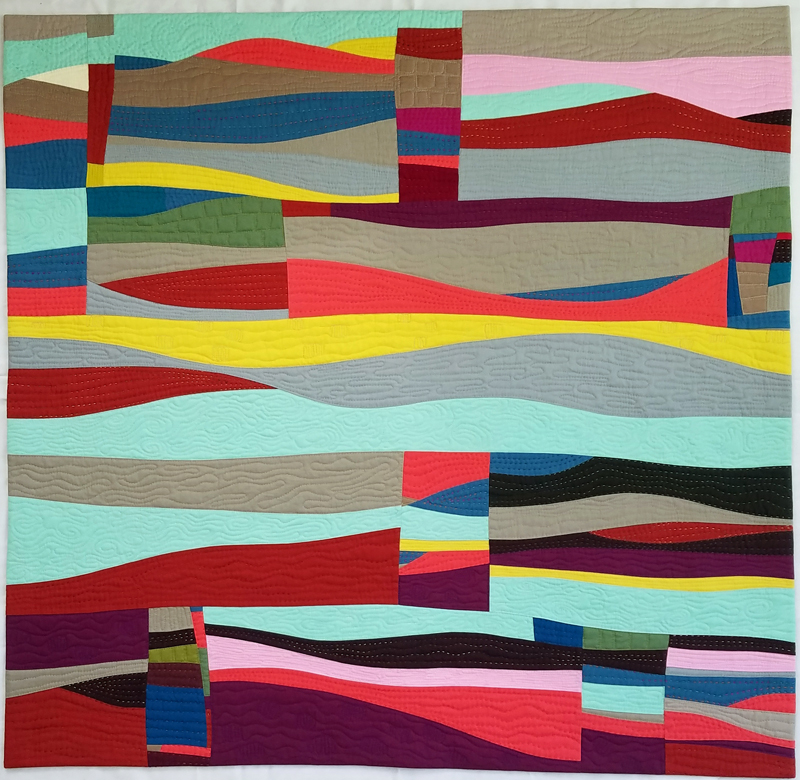
Crevices began in a virtual workshop with Maria Shell @talesofastitcher which focused on freehand curve and circle techniques. The class was a sampler, but I was particularly intrigued by a technique Maria calls “braided curves”. I pieced a lot of these rectangular units using a controlled palette and began the task of creating a composition.

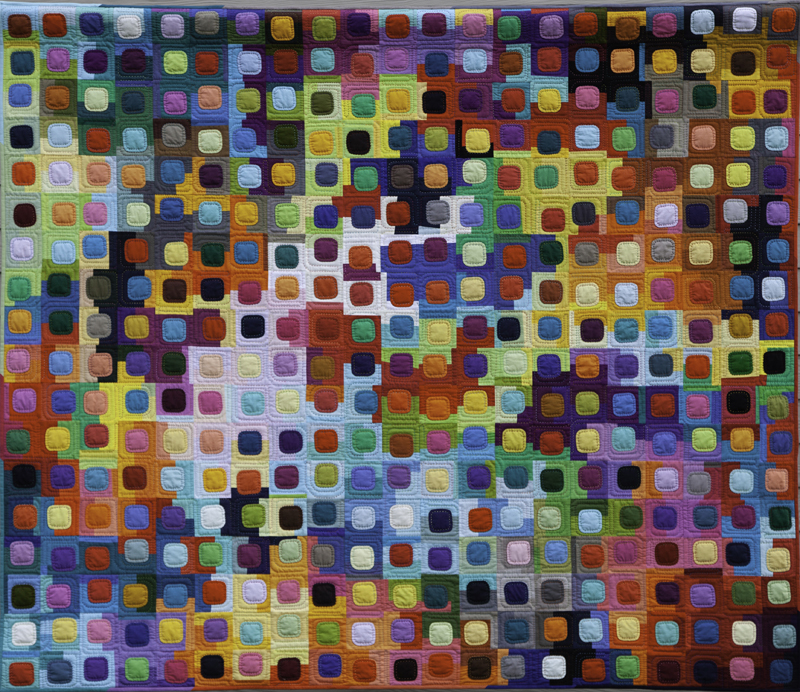
After about a month of manipulations on the design wall, I decided to edit out many of the units. As I worked, an image of light streaming into a canyon emerged in my mind.

Representational art is not my style and I struggled with how to create the abstract feeling of sunlight on geological structures without it becoming too literal. The palette also felt constrained, so I began adding in new shades as I pieced in additional curvy lines. This exercised my brain in such a good way!

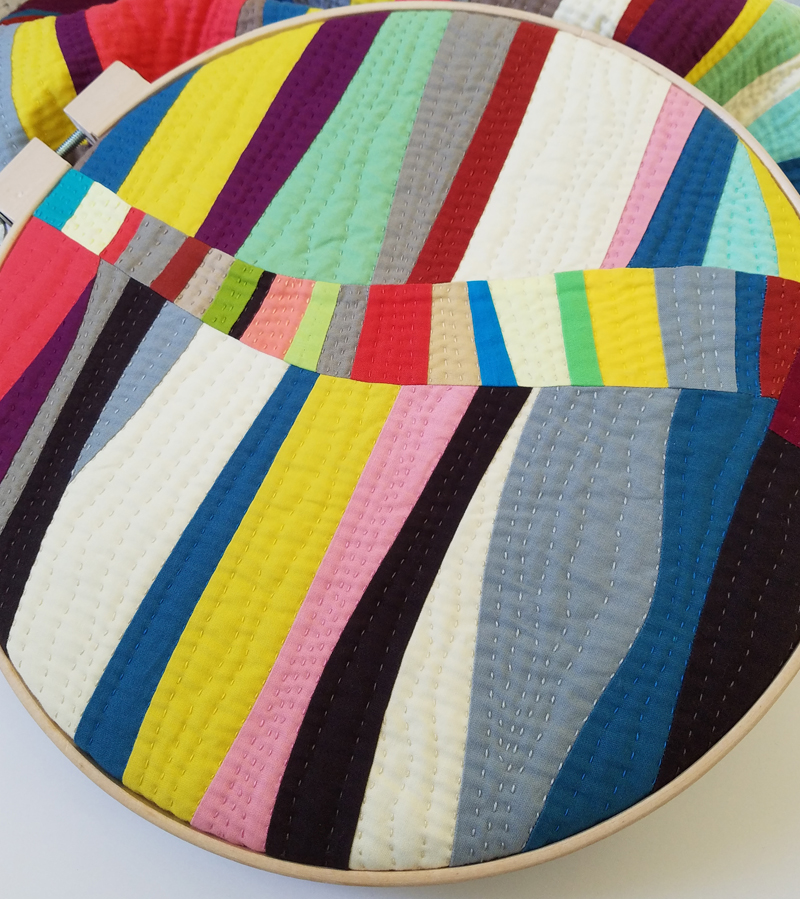
Thread basting is my preference when hand quilting because I don’t like to snag my thread on pins.

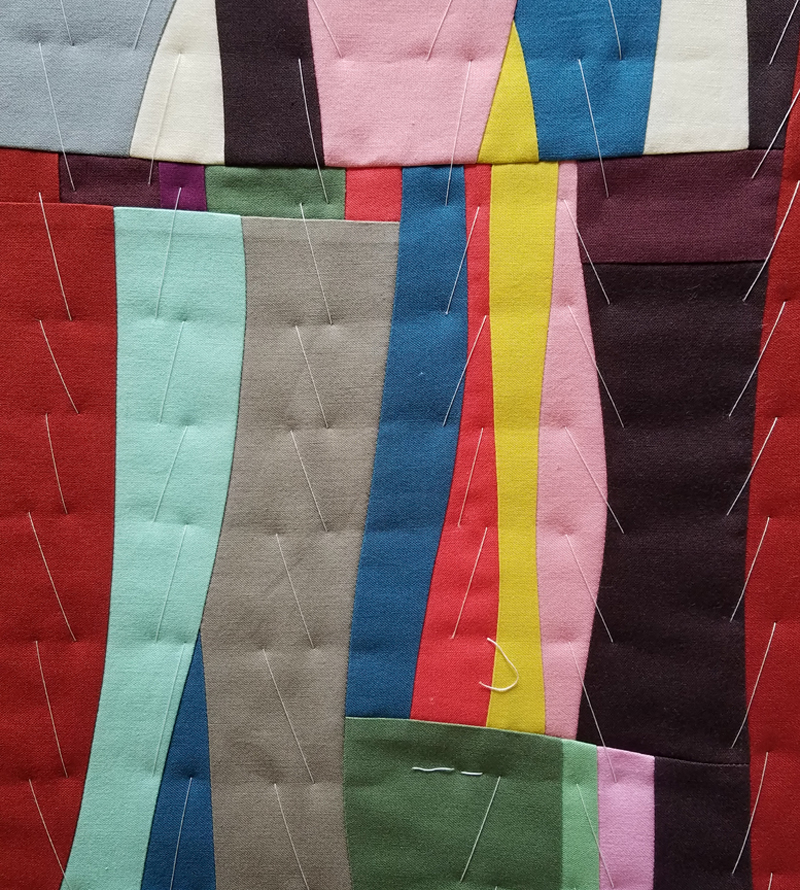
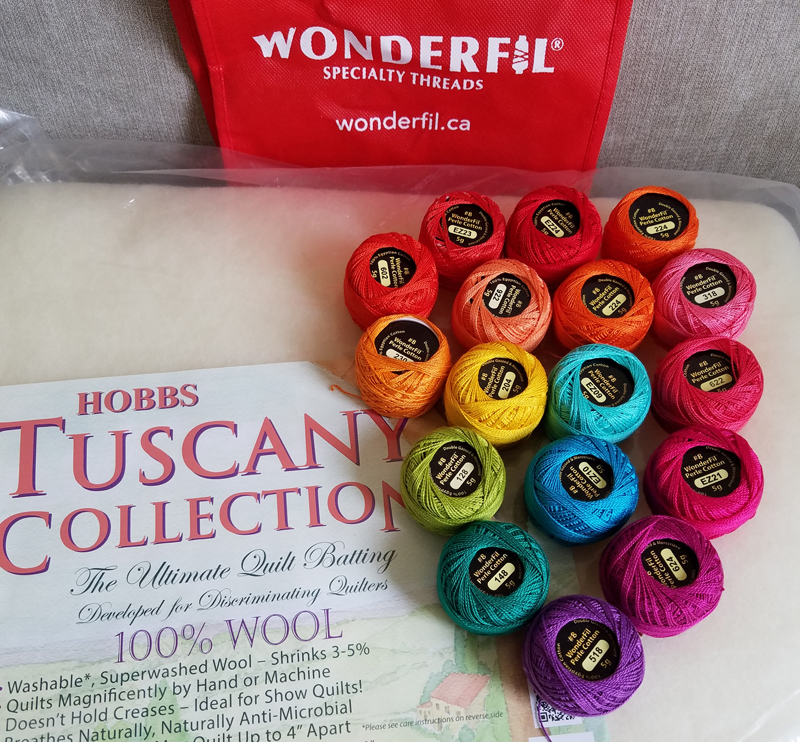
The large, curved spaces invited me to add texture by hand quilting. It was so relaxing to stitch these wavy lines using a variety of perle cotton threads.

Originally, I had planned a faced edge, but in the end I decided to go with a pastel binding. I like the way it frames the piece, bringing the lighter shades from the center of the quilt out to the edges. (In real life, the binding is much straighter than the photo would suggest, I promise!)

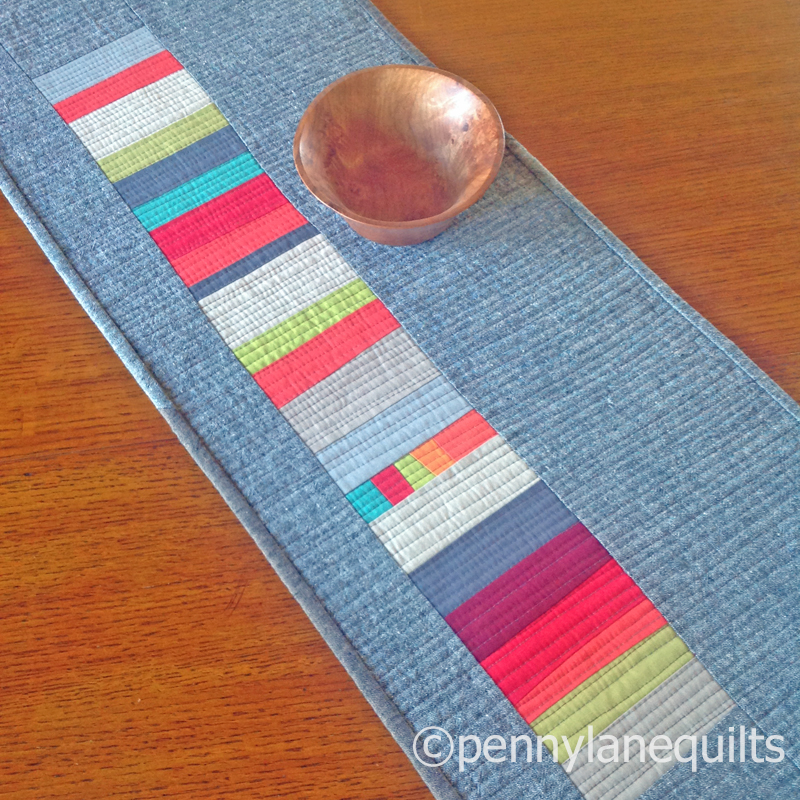
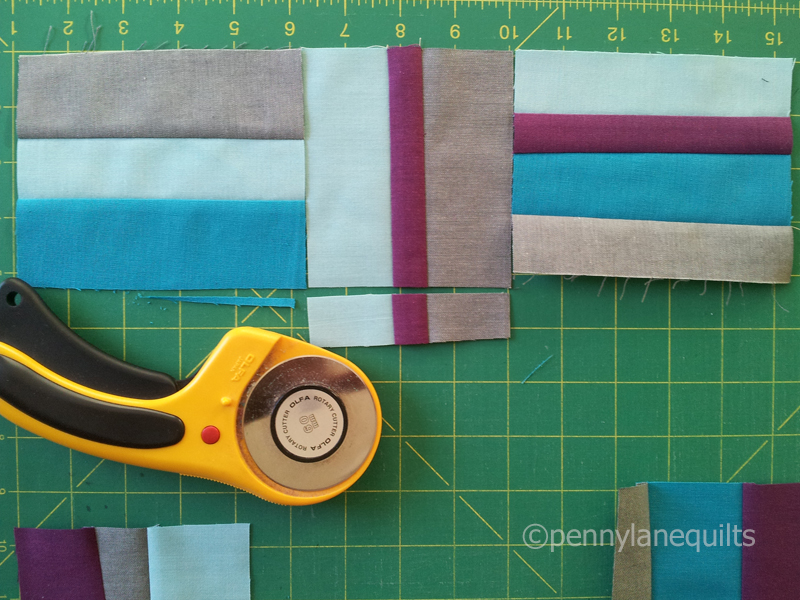
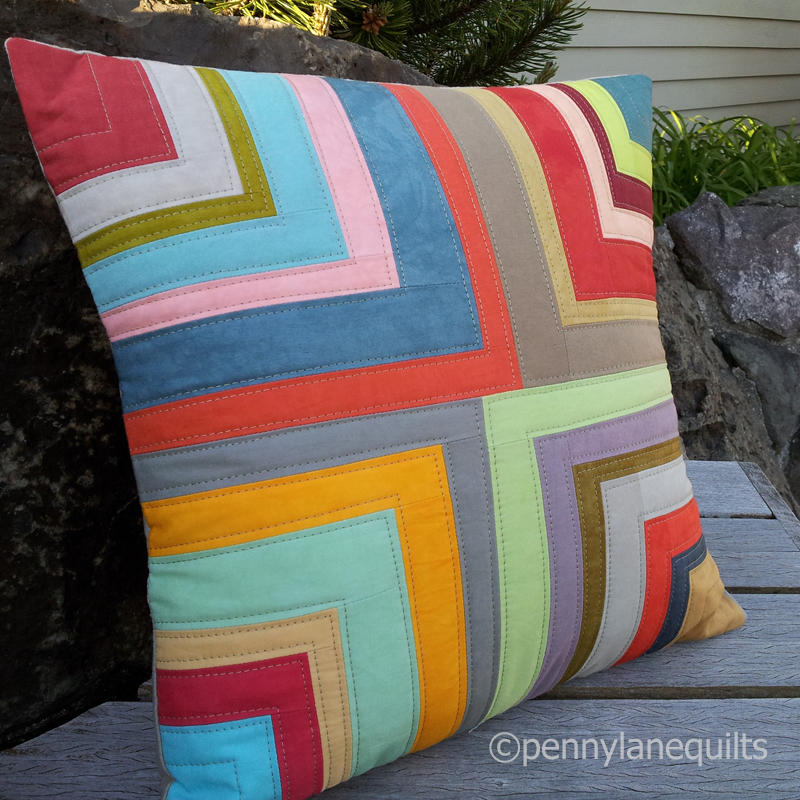
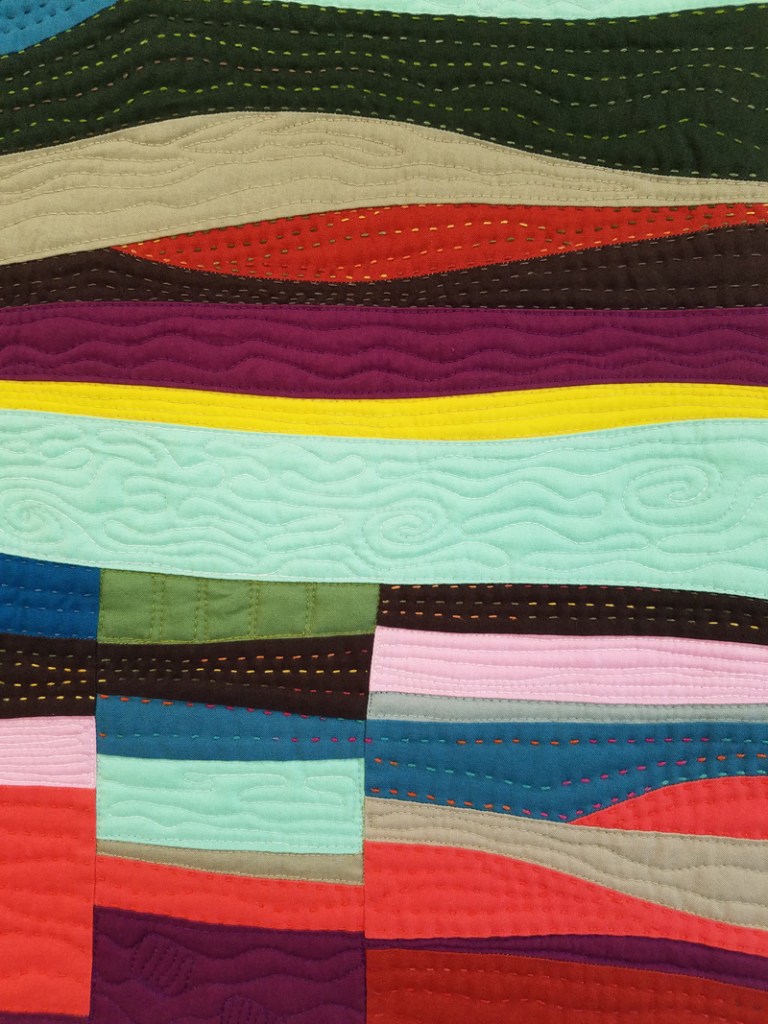
And what did I do with all the pieces that were edited out of this composition? I created another quilt.

Placing the strips in a horizontal orientation, images of mountains, streams and valleys emerged. For this piece, I challenged myself to work quickly and intuitively, restricting myself to using the leftovers from Crevices. Meander is the result.

Meander (38″ x 36.5″) machine pieced, machine and hand quilted

Improving my free motion quilting skills is an ongoing goal of mine. I explored some organic filler designs and used many motifs from Christina Cameli‘s book, Step-by-Step Texture Quilting. Lots of thread changes and adjusting the motifs to fit the shapes took all of my concentration. About half way through, it was beginning to feel flat and stiff from all the dense quilting. Adding in sections of hand stitches softened the texture.

And what did I do with the leftovers? I still had lots of odd bits that I was determined not to add to the scrap bins, so potholders to the rescue! I donated these to the Friends of the International Quilt Museum to sell in the gift shop as a fundraiser.

Whenever I take a technique workshop, I feel that it shakes things up in my studio. Since I rarely use strip piecing techniques, creating these large units initially felt very quick and satisfying. However, I found it challenging to shape them into compositions. Every quilt teaches me something new!

For the Love of Squircles

First of all, I’d like to welcome the new readers to the blog since my last post. This quilt was largely responsible for my long absence! I am just adding a label and preparing to ship to Austin, so it is time to tell its story.

The quilt began as a daily project in January of 2018. After piecing my first squircle quilt using print fabric in 2017, I decided to repeat the process with solid fabrics. This time I pieced the background of each block before using needle turn applique to attach the squircle shapes. All of the fabrics came from my scrap bin, and were pieced and stitched randomly, with no particular design in mind.

At the end of the year, I had my 365 blocks plus the 13 extra to again bring my array to 18 x 21. Unlike the previous quilt that was assembled as I went along, this time I had 378 blocks to arrange on the design wall. Looking back through my photos, it looks like I arranged and rearranged them for over a month!

arranging the squircle blocks

I began piecing the blocks just before heading to Nashville for QuiltCon and finished piecing mid-April.

piecing the squircle quilt

By the middle of May, it was basted with a fluffy Hobbs Tuscany wool batting and an extra wide peppered cotton backing. I loved the way it felt once it was basted and couldn’t wait to start hand quilting!

preparing to baste For the Love of Squircles

Fortunately, I  had stocked up on WonderFil Eleganza perle cotton #8 while I was at QuiltCon.

My goal was to have it completed by the December 2 deadline for  submissions to QuiltCon 2020 in Austin. Here is my hoop on the first day of quilting.

squircles quilt hand quilting, Marla Varner, penny lane quilts

After quilting for a few days, I estimated that I would need to quilt an average of three hours a day to make that deadline. That seemed doable! I worked on it steadily throughout the summer and tried to make up for lost time when I was away from home on other adventures.

By September, it became obvious that I had miscalculated, and I began quilting all day every day. This is not something I would recommend, as it takes a toll on the body.  I tried to  consistently  take breaks, do hand and shoulder exercises, change chairs and positions which all helped to keep me stitching. I also listened to a LOT of audiobooks. There were many days when I abdicated all but the most pressing of daily responsiblities. And here is my hoop on the final day of quilting.

last day of quilting For the Love of Squircles by Marla Varner penny lane quilts

Late November found me trimming and attaching the binding. Trying to get good photos on gray, rainy days was a stressful part of the submission process. A goal for this year is to improve my photography set up.

My diligence paid off and the quilt submission was in before Thanksgiving…a new record for me! Many thanks to Audrey Esarey @cottonandbourbon for suggesting the name of the quilt to me. (She is a rising star in the modern quilt community…I highly recommend you check out her amazing work.)

For the Love of Squircles by Marla Varner penny lane quilts

It was so exciting to get the news that it was accepted to QuiltCon and I am looking forward to traveling to Austin again. Maybe I’ll see you there!

Kinetic

Back in April, 2017, I learned that my friend Daniela, BlockM Quilts,  would be visiting Seattle (from Germany) and planned to take a workshop with Katie Pedersen , SewKatieDid. I jumped at the opportunity to join Daniela at Katie’s studio for the Psychedelic Baby Quilt Block/Modern Improv Strip Piecing Workshop.

After viewing many of Katie’s wonderful quilts using this block, we each came up with a plan and began creating strip sets.

beginning strip set penny lane quilts

After the strips were pieced, we cut blocks from each set.

Daniela BlockM Quilts working on psychedelic baby quilt blocks
Daniela arranging a new strip set

psychedelic baby quilt blocks
When the blocks are cut, they create lots of “waste” triangles as seen in the center of the photo

Back home, I created a few more blocks and decided on a layout for my quilt.

psychedelic baby blocks for my quilt

After deciding to hand quilt, I gathered my perle cotton threads and began the lovely, SLOW process of adding texture to the quilt.

detail of hand quilting, marla varner, penny lane quilts

detail of hand quilting from the back side of Kinetic, Marla Varner, penny lane quilts
detail of the quilting from the back

I tend to hand quilt in spurts, here and there when I have time. It is the perfect portable project. This quilt has traveled on  long road trips and made an appearance at several  events. Every stitch helps move the project along.

hand quilting during port townsend studio tour Marla Varner, penny lane quilts
Stitching and enjoying the view at Egg & I Pottery during the Port Townsend studio tour.

When the quilting was eventually finished, I decided to use yarn dyed linen  for the binding. I tried something new (for me) and did some visible stitching to attach the binding on the back. It was fun to change thread colors as I went around the quilt using 8 wt perle cotton.

binding detail using perle cotton

All it needed was a name and a label and just like that (lol), a finished quilt almost two years in the making.

label for Kinetic, Marla Varner, pennylanequilts

Kinetic, by Marla Varner, Penny Lane Quilts
Kinetic (43.5″ x 58″)

Kinetic view of back Marla Varner, pennylanequilts

Love this view with the sun shining through the layers. I think it looks downright psychedelic!

sun shining through Kinetic, Marla Varner

Now that this one is finished, I am free to start playing with those leftover triangles…

leftover triangles from Kinetic


leftovers

A confession…I love leftovers, both food and fabric! They give me an opportunity to be creative, I feel virtuous for not being wasteful and sometimes they even save me a little time.

Here are a few recent finishes that began as orphan blocks, trimmings or bits and pieces floating around the scrap bin and design wall.

Some leftover strips became a table runner.

linen table runner by marla varner
Essex yarn dyed linen + commercial solids for the stripes

A few orphan blocks became a pillow and a table mat.

improv pillow by marla varner
orphan blocks + Essex yarn dyed linen

table mat with skinny stripes by marla varner
another orphan block + Essex yarn dyed linen

And sometimes everything “clicks” and a few units that have been marinating for a long while are the impetus for something that keeps me exploring, and revising, and reworking until it makes me very happy!

"jubilant" by Marla Varner
“jubilant”, hand dyed cottons, Essex yarn dyed linen, matchstick quilting

So, the moral of the story is… save all those leftover bits because you never know when they will be just what you need to get your next project started!

(The table runner and place mats in the featured image began as some odds and ends from the recent Riley Blake challenge.)

2016 Cloud9 new block blog hop

Welcome to the second day of the 2016 Cloud9 New Block Blog Hop!cloud9newblockbloghopbutton-700x700

It is so exciting to be part of the block hop, sponsored by Cloud9, and hosted by Yvonne of Quilting Jetgirl, Cheryl of Meadow Mist Designs and Stephanie of Late Night Quilter! There are almost 70 bloggers designing blocks using the fat quarter bundle of lovely organic Cirrus Solids generously provided by Cloud9 fabrics. The hosts chose this palette for the hop, called “Berry Harvest”.  I decided to use four of the colors, leaving “Lilac” out this time around.color palette for New Block Blog Hop

My block, Woven Berry Basket, is an improvisational block based on the traditional basket weave design.  It uses a free form cutting technique (a.k.a cutting without a ruler).woven berry basket, 2016 Cloud9 New Block Blog Hop, marla varner, pennylanequilts

The goal of this tutorial is to introduce you to this technique. There are two main principles that I use in improv piecing:

  • if it is too short, add on
  • if it is too long, cut it off

Your block will not be exactly like mine, but I will describe a process that you can use to make one that is similar in design.

Tips for improv piecing:

  • A rotary cutter with a 60mm blade is my preference for free form cutting
  • Set the stitch length on your machine a little shorter than usual
  1. Cut 4 strips 5 in x 18 in  (approx) Here’s your first chance to cut without the ruler!

berry basket weave tutorial, marla varner, pennylanequilts
free hand cut the equivalent of 4 strips approx 5 x 18 (notice the cut is straight-ish)

2. Free hand cross cut strips that vary from about 1 in – 2 .25 in width from each strip

basket weave tutorial, marla varner, pennylanequilts
I like to cut each strip individually, some are slightly angled, but most are straightish

3. Stitch 9 pairs of strips together, varying the colors and widths.

berry basket weave tutorial, marla varner, pennylanequilts
chain piece 9 sets of strips, no need for pins, just go slowly and align the edges as you go

4. Press seams to the darker fabric

berry basket weave tutorial, marla varner, pennylanequilts
variety of widths and color combinations

5. Add a third strip to each set, again varying the color placement and width of strips.

woven berry basket, marla varner, pennylanequilts

6. Lay out the 9 units in an alternating vertical, horizontal pattern.

woven berry basket, marla varner, pennylanequilts
To end up with a 12.5 unfinished block, we will aim to have each unit be at least 4.5 in on each side before assembling. (I trimmed the ends to even up the units.)

*At this point, you will need to start making decisions based on how your units are sized. I will attempt to describe how I solved the puzzle.

For the first row, I decided to cut the bottom off the middle unit, and add a strip to the third unit.

row 1 piecing
If it’s too long, cut it off and if it’s too short, add on!

I followed the same procedure for the second row:

second row assembly
a strip added to the middle unit

But when the units were assembled, the second row was shorter than the first, and I was aiming to have each row approx 13 in wide so that I would be able to trim it down to 12.5 in. What to do? Add on!

second row
I used the cutting mat measurements to see if the overall width was about 13 inches

To assemble the rows, I trimmed the top edge of the second row, then overlapped it onto the bottom of the first row (right sides facing up). Using that cut edge as my guide, I trimmed the bottom of the top row to match.

assemble rows
*use the ruler to stabilize the edge, but do not use it as a cutting edge

Follow the above procedures to assemble the third row and attach.

Can you see how I am cutting along the edge of the row, not along the ruler edge?

If your block is big enough, just trim to 12.5 in square and your block is complete. If it is too small, improvise! You might add some strips to form a frame, and then trim.

trim block to 12.5 in
Success! Trim to 12.5 inches and you’re finished.

Here is my finished block:finished blockThe thing I like best about improvisational work is that you are engaged making design decisions throughout the process. *Warning: this may be addictive!  As I work, I find myself asking lots of “What if?” questions:

  • What if I cut the strips wider (or thinner)?
  • What if I used 5 colors?
  • What if I only used 2 colors?
  • What if it was scrappy?
  • What if the units were smaller and I made a 4 x 4 grid?

I hope you will give this a try, and that you will enjoy the process as much as I do. If you make a block, I’d love to see it! For those on Instagram, tag your photo @pennylanequilts and use the hashtag #wovenberrybasket.

Thanks for stopping by! I’d love to hear your thoughts and answer any questions you may have.

And don’t forget to enter the Giveaways!  Visit each of our wonderful hosts for the chance to win 3 separate fat quarter bundles of beautiful Cloud9 Cirrus Solids.

Be sure to check out the rest of the stops on the hop. You’ll be glad you did!

September 12, 2016 hosted by Yvonne @ Quilting Jetgirl


September 13, 2016 hosted by Cheryl @ Meadow Mist Designs

September 14 hosted by Stephanie @Late Night Quilter

pillows, what’s not to love?

Pillows are one of my favorite projects to make. Each one is its own little composition, and it’s a great way to create something decorative and  functional  for your home. I think they make great gifts, too.

pillow, hand dyed fabrics, Marla Varner
improv piecing and hand dyed fabrics

If you want to try a new piecing technique,  a bit of free motion quilting or even some hand quilting, a pillow is a much smaller commitment than a quilt. Last month I experimented with some worn out jeans and some thrifted shirts.

upcycled denim pillows, Marla Varner
upcycled denim pillows

pillows made from upcycled shirts
pillows from upcycled shirts

Orphan blocks can find a new home in a pillow. A bit of special, long hoarded fabric can be featured in a place of honor. Experiment with a new color scheme and see where it takes you.

pillow, hand dyed fabrics, MarlaVarner
improv piecing with hand dyed fabrics

pillow made from hand dyed fabrics
improv piecing with hand dyed fabrics

What’s your favorite quilted project?