

Welcome to the second day of the 2016 Cloud9 New Block Blog Hop!
It is so exciting to be part of the block hop, sponsored by Cloud9, and hosted by Yvonne of Quilting Jetgirl, Cheryl of Meadow Mist Designs and Stephanie of Late Night Quilter! There are almost 70 bloggers designing blocks using the fat quarter bundle of lovely organic Cirrus Solids generously provided by Cloud9 fabrics. The hosts chose this palette for the hop, called “Berry Harvest”. I decided to use four of the colors, leaving “Lilac” out this time around.
My block, Woven Berry Basket, is an improvisational block based on the traditional basket weave design. It uses a free form cutting technique (a.k.a cutting without a ruler).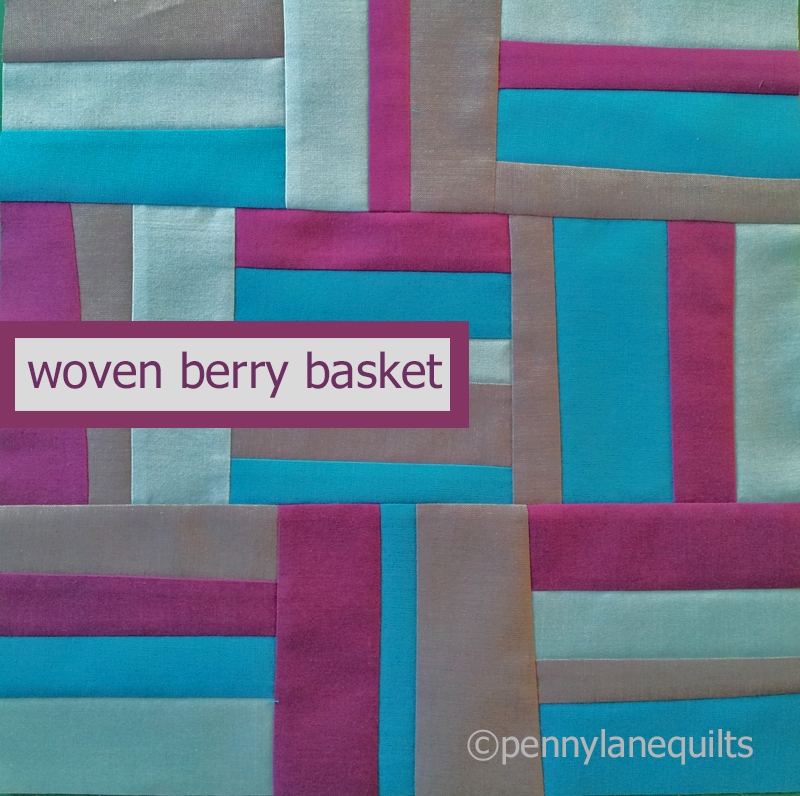
The goal of this tutorial is to introduce you to this technique. There are two main principles that I use in improv piecing:
- if it is too short, add on
- if it is too long, cut it off
Your block will not be exactly like mine, but I will describe a process that you can use to make one that is similar in design.
Tips for improv piecing:
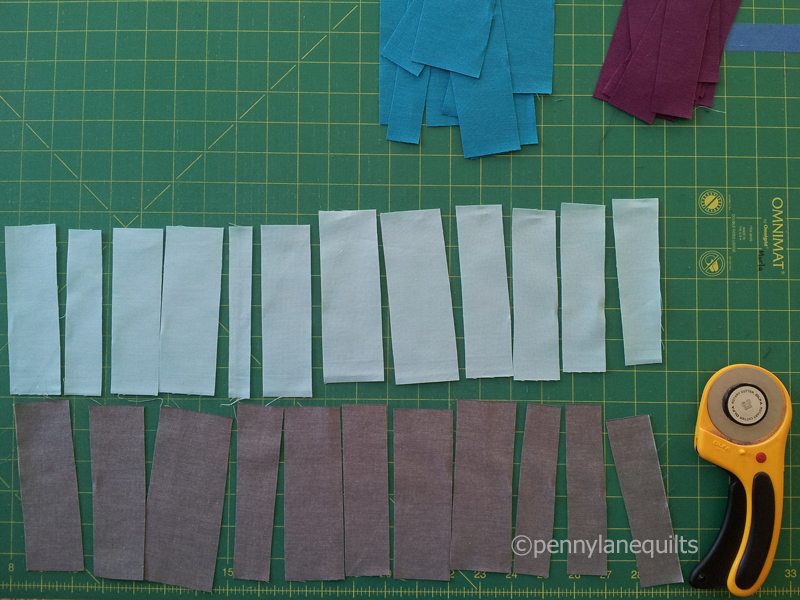
- A rotary cutter with a 60mm blade is my preference for free form cutting
- Set the stitch length on your machine a little shorter than usual
- Cut 4 strips 5 in x 18 in (approx) Here’s your first chance to cut without the ruler!

2. Free hand cross cut strips that vary from about 1 in – 2 .25 in width from each strip
3. Stitch 9 pairs of strips together, varying the colors and widths.

4. Press seams to the darker fabric

5. Add a third strip to each set, again varying the color placement and width of strips.

6. Lay out the 9 units in an alternating vertical, horizontal pattern.

*At this point, you will need to start making decisions based on how your units are sized. I will attempt to describe how I solved the puzzle.
For the first row, I decided to cut the bottom off the middle unit, and add a strip to the third unit.

I followed the same procedure for the second row:

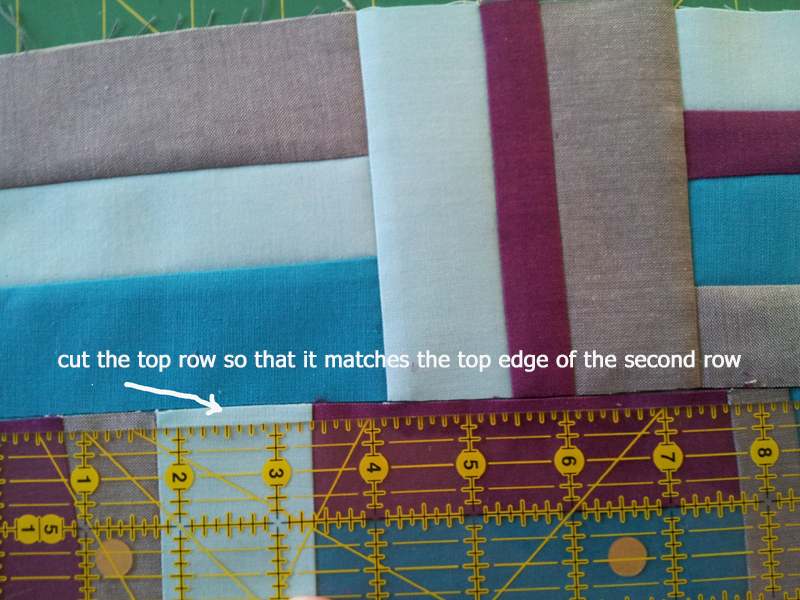
But when the units were assembled, the second row was shorter than the first, and I was aiming to have each row approx 13 in wide so that I would be able to trim it down to 12.5 in. What to do? Add on!

To assemble the rows, I trimmed the top edge of the second row, then overlapped it onto the bottom of the first row (right sides facing up). Using that cut edge as my guide, I trimmed the bottom of the top row to match.
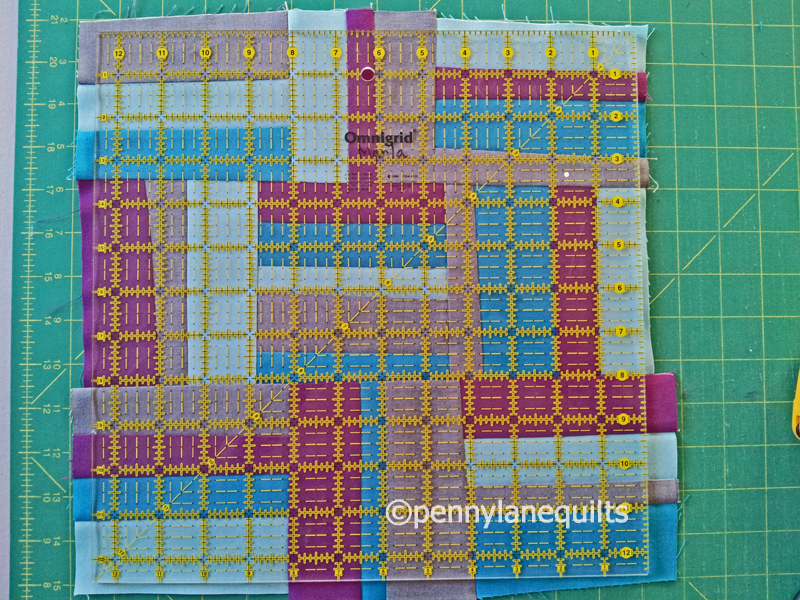
Follow the above procedures to assemble the third row and attach.

If your block is big enough, just trim to 12.5 in square and your block is complete. If it is too small, improvise! You might add some strips to form a frame, and then trim.
Here is my finished block: The thing I like best about improvisational work is that you are engaged making design decisions throughout the process. *Warning: this may be addictive! As I work, I find myself asking lots of “What if?” questions:
- What if I cut the strips wider (or thinner)?
- What if I used 5 colors?
- What if I only used 2 colors?
- What if it was scrappy?
- What if the units were smaller and I made a 4 x 4 grid?
I hope you will give this a try, and that you will enjoy the process as much as I do. If you make a block, I’d love to see it! For those on Instagram, tag your photo @pennylanequilts and use the hashtag #wovenberrybasket.
Thanks for stopping by! I’d love to hear your thoughts and answer any questions you may have.
And don’t forget to enter the Giveaways! Visit each of our wonderful hosts for the chance to win 3 separate fat quarter bundles of beautiful Cloud9 Cirrus Solids.
Be sure to check out the rest of the stops on the hop. You’ll be glad you did!
September 12, 2016 hosted by Yvonne @ Quilting Jetgirl
September 13, 2016 hosted by Cheryl @ Meadow Mist Designs
Miranda @I Have Purple Hair
Jennifer @The Inquiring Quilter
Sarah @123 Quilt
Leanne @Devoted Quilter
Jen @Patterns By Jen
Jennifer @RV Quilting
Amanda @Quiltologie
Sharon @Yellow Cat Quilt Designs
Jen @A Dream and A Stitch
Jen @Faith and Fabric
Carole @Carole Lyles Shaw
Stephanie @Quilt’n Party
Susan @Sevenoaks Street Quilts
Katrin @Now What Puppilalla
Amista @Hilltop Custom Designs
Nicole @Handwrought Quilts
Marla @Penny Lane Quilts
Silvia @A Stranger View
Sarah @Smiles Too Loudly
Carrie @the zen quilter
Mary @Quilting is in My Blood
Velda @GRANNYcanQUILT
September 14 hosted by Stephanie @Late Night Quilter

This seems like a really fun technique and very freeing! I like your Woven Berry Basket!
LikeLiked by 1 person
What a fun block, and great instructions.
LikeLiked by 1 person
I love the name and the block and the technique is definitely worth a try. Well done 👏👏👏
LikeLiked by 1 person
What a great intro to improv piecing! Your explanation for piecing the rows is excellent, just add on or take away. And I like to the What If’s! Well done!
LikeLiked by 1 person
Love your berry basket. Love improv.
LikeLiked by 1 person
Love your block and technique. Great job on the tutorial too!
LikeLiked by 1 person
It’s beautiful and I can envision all the ‘what ifs.’
LikeLiked by 1 person
What a lovely introduction to improvisation. I really like the way your block turned out. Thanks so much for joining the hop!
LikeLiked by 1 person
This is so awesome! Love the way it looks as a finished block. So different!
LikeLiked by 1 person
I love your improv block and such a great explanation, so inspiring.
Smiles
Kate
LikeLiked by 1 person
this is so cool. i really need to give this a try. you make it look so very simple. thanks for shairng
LikeLiked by 1 person
It is simple, and the beauty of it is that there is no wrong way to do improv piecing!
LikeLike
I love your two main principles of improv! Words to live by! Great job on your block and your tutorial!
LikeLiked by 1 person
This is a great tutorial on improv sewing. Your tutorial is really well done.
LikeLiked by 1 person
A very fun block, and a great explanation of the process!
LikeLiked by 1 person
Great technique, blocks and instructions! I really like the finished block.
LikeLiked by 1 person
Very nice! I like wonky.
LikeLiked by 1 person
Love your straight line block and the color combo.
LikeLiked by 1 person
I really like your block, gonna try in scraps
LikeLiked by 1 person
I like your block and plan to make it.
LikeLiked by 1 person
Really neat block. I think it’s so cool you described a process that can be used in this way, or in many other ways. Lots of options. Thanks for the block!
LikeLiked by 1 person
I was hoping to highlight a process that can transfer to other applications. In fact, my next blog post will show what I did with some leftover practice units and some spare strips. Stay tuned!
LikeLike
Love that you used improv for your block.
LikeLiked by 1 person
Hi Marla – thank you so much for a really interesting block and process on how to do it. I love improv but have not done much so it’s lovely to have an idea what to do to achieve a certain look. Will be adding this to my to do list!
LikeLiked by 1 person
I just love improve! It’s freedom at it’s best 🙂 Um, but why do you suggest a 60″ rotary cutter? I’ve only got a 45″ one and I’m wondering what the upside is to adding the larger one to my tool set? Any excuse to buy more tools, right?!!
LikeLiked by 1 person
Shannon, thanks for asking that excellent question! I prefer the 60 mm because it doesn’t seem to push the fabric as much and I can get a smoother line especially when working with curves and pieces with lots of seams. You definitely do not need it for this block, but if you really get into improv, you might want to make the investment. (Maybe there will be someone at a guild meeting or a fabric store that would let you try one to see if you like how it feels.) As per any project, a sharp blade on the 45 mm will work just fine.
LikeLike
Love this block! It looks like a good introduction to improv. Must give it a try!
LikeLiked by 1 person
Love your gorgeous block and I am 100% on board with your piecing principles! Isn’t improv the best?! 🙂 Lovely work, Melva!
LikeLiked by 1 person
Yes, in my opinion, improv is the most fun way to play (I mean work)!
LikeLike
Improv is so hard for me for some reason. But your instructions would make it easy. Very cute block. Great tutorial.
LikeLiked by 1 person
I have heard from a lot of people who echo your feelings that improv is hard for them. Since I want to share the improv love, my plans are to do a series of tutorials for people who are new to the process. I’m sure there are already lots of great resources out there, but since improv is so personal, everyone probably approaches it in different ways. I’m crazy busy right now, but I hope to make this a regular feature beginning in 2017.
LikeLike
I’ve never tried improve quilting and am a bit intimidated by it. But your tutorial was great and took some of the fear away leaving me thinking…”I could probably do this.” Thanks for sharing. I’m still visiting everyone’s posts as things have been a tad bit busy around here. It’s interesting that no one, so far anyway, has duplicated someone else’s idea. Love the name of your block; it really fits the block.
LikeLiked by 1 person